Pages

Showing posts with label yellow. Show all posts

Sunday, March 22, 2015

Indie Spotlight: Paint Shop Polish, May Flowers & In Bloom


Hello there!  Yes, I know it's been ages and ages since I've posted.  There are tons of excuses I could make, but what it boils down to is just feeling burnt out on blogging.  There just came a point where all the swatching, photo editing, and writing just wasn't fun for a bit and I was all like "Blogging is hard!" so I took a break.  But I'm dipping my toes back in the water, just to test it out.  I can't promise regularity with posting but be sure to follow me on Facebook and Instagram (user name is @vashtiaa).  I tend to post quick shots of current manicures on those accounts.

Alright, back to the point of today's post!  Paint Shop Polish has a new spring collection coming out on Monday, March 23 and I was lucky enough to get to swatch a couple of pretties and I have some photos of those to show you today! 


First up is In Bloom, an appropriately named floral glitter topper.  Large iridescent lavender flower-shaped glitter swim in a clear base with smaller petal pink,  daffodil yellow, and violet hexes, lilac squares, and a healthy sprinkle of holographic micro glitter.  This is just a perfectly pretty spring mix!


I applied In Bloom first in one thin coat to spread out the holographic sparkle and then by dabbing the larger glitters on.  The gradient underneath was created using Sinful Colors Unicorn and Out of Bounds.  In Bloom was fairly easy to work with, the base is a good consistency; not too thick or gloppy.  I did have to fish a bit for the larger flower glitters, but that's pretty much par for the course when it comes to big glitters.  You'll also want a good top coat to smooth out any bumpiness from the glitter.


If you're a glitter topper fan, In Bloom is definitely worth a look.  So pretty!


May Flowers is the second polish I have to show you today.  We all know what a sucker I am for a good crelly and this one fits the bill!  Icy blue iridescent flower glitters are accompanied by small hexes in the same shade and periwinkle hexes in a squishy white crelly base.  This was my favorite of these two polishes...love the glitter mix and the base is beautiful!


No application issues to report, beyond the necessity to fish a bit for the larger glitters.  I'm showing 3 coats here with one coat of Seche Vite on top.  Really just a lovely polish!


May Flowers and In Bloom will both be available this Monday, March 23 on the Paint Shop Polish Etsy site.  A 5ml mini bottle retails for $5.50 and a full size 15ml bottle is $10.  Also, Candi is currently offering 15% off $15 with code PADDYS15 or free US shipping with a $25 order with code FREESHIP25. Both codes will expire on March 31st so don't wait!. Be sure to follow PSP on Facebook to keep updated on new products, sales, and other important info!

Thanks so much for reading!  I hope you enjoyed this post and I'd love to hear from you in the comments section below!

Tuesday, January 7, 2014

Try It On Tuesday: LynBDesigns Ametrine

*Unsolicited review. Gothic Gala Lacquers Smooth Me Over provided for separate unbiased review. All other products purchased by me.*

Hey there!  It's been a few weeks since I managed to get a Try It On Tuesday post done, but with all the polishes I snagged with the holiday sales, I better get back on the bandwagon cuz my untrieds bin is overflowing again!  I'm loving the polish I picked for today's post...give a look!


Ametrine from LynBDesigns is part of her Gem Show collection inspired by semi-precious stones.  If you're unfamiliar with the real life stone ametrine, it's a combination of amethyst and citrine.  I'm not sure how it forms but it is a lovely stone with purple, amber, and yellow tones.  Jenna has done a great job recreating the colors in this polish! 
 

Ametrine is a squishy purple jelly base with bunches of large lavender holographic dots, gold hexes in three sizes, bright purple hexes, and small lavender hexes.  The glitter mix is gorgeous and this baby is chock-full!  And I had no issues getting the glitters out of the bottle.  In fact, the large dots practically overwhelmed this mani, I got so many of them each time I dipped lol She's a stunner of a polish!  I'm wearing 3 coats here with one coat of Gothic Gala Lacquers Smooth Me Over top coat and one coat of Seche Vite. You will want a smoothing top coat with Ametrine, she's a little bumpy but totally worth the extra work!


*Unsolicited review. Gothic Gala Lacquers Smooth Me Over provided for separate unbiased review. All other products purchased by me.*

Ametrine is currently available on LynBDesigns' Etsy shop and retails for $8.00 for a full size 15ml bottle.  Jenna has some awesome fandom collections and her holos are gorgeous!  Be sure to follow LBD on Facebook to keep up with new releases, updates, and she always has fantastic sales...you won't want to miss them!  Thanks so much for reading!

Wednesday, October 23, 2013

Mish Mash Challenge: Rainbow Nails


It's Hump Day!  That means it's Wednesday!  That means it's Mish Mash Challenge day!  I skipped last week's challenge because I spent so much time on my Sanderson Sisters manicure, then I almost skipped this week because of another Halloween manicure I've been working on (which will also hopefully be posted tonight!), but I didn't want to skip two weeks in a row...especially on the Rainbow Challenge!  I know there are going to be some stunning designs this week and I can't wait to see them!  After all the nail art I've done lately, I just stuck with some simple skittles for this week's Challenge.


I did dress these up a bit by using linear holographic polishes so you get rainbows with your rainbows!  Like I said, they're pretty simple but I like 'em!  I'll list the polishes at the end of the post so you can check 'em out if you'd like to.  Though I think a lot of folks were unimpressed with the China Glaze Holographics collection, the ones I've purchased (on half off of clearance at Sally's...woot!) are really pretty in my opinion.  They aren't in-your-face crazy holos, but the linear IS there and it's quite nice.


I apologize for the lack of sunlight in these photos but that's been in short supply lately here in Chicago.  If Apollo manages to drag his chariot into the sky tomorrow, I'll snap a quick one to show you the linear rainbows.

Polish List:
LynBDesigns~Am I Ginger?
DifferentDimensions~Tubular 
China Glaze Holographic~Not In This Galaxy, OMG A UFO, Strap On Your Moonboots 

Please take a minute to peruse the other Mish Mashers' work this week...I'm betting it'll be pretty!  You can find them via the thumbnails below.  Thanks so much for reading!


Tuesday, June 25, 2013

ABC Challenge: Y is for Yellow and You're Such A Square


Hi, everyone!  I'm starting with a public service announcement here.  As many of you know, Google Reader is leaving us as of July 1st...which, believe it or not, is next week!!  I'm really not sure what this means for everyone who follows my blog via GFC, but if you want to make sure you're updated when I post, you can follow me via Bloglovin'.  The easiest way to do that is to click on the "Follow this blog with bloglovin'" button to the right of this post, or you can go here and click "Follow" as well.  I hope you all will continue to follow me!  And now, on to my ABC Challenge post!

OMG!  We only have one letter left after this week!  I can't believe this challenge is almost over.  Makes me a little sad, I've had so much fun with this.  Anyway, this week's ABC Challenge letter is 'Y'.  I kind of went for the obvious here, but I do like how it turned out.  Take a peek:


'Y' here mostly stands for yellow, although I did use Hit Polish's You're Such a Square, so I managed to get 2 in there!  I started with 2 (ish) coats of Barielle's Lemondrops, a bright, true yellow creme.  My intention was to do a chevron french manicure, so I taped of the chevrons on the tips of my nails and then applied 2-3 coats of YSAS.


YSAS is pretty magical as far as I'm concerned.  It has bunches and bunches of several sizes of squares in every color of the rainbow, including holographic, all packed into a clear base.  Y'all know I love my dots, but these squares are adorable!   You'll also notice that my chevron tips didn't really work out too well.  The idea is there, but the glitter doesn't give enough definition to the line, in my opinion.  That said, I'm really diggin' this manicure.  It's cheery and fun and from a distance, it just looks like a glitter gradient.


Hit Polish (formerly D&R Apothecary) can be found on their etsy store and Rachel currently has a 20% off sale going.  There are some real beauties up there, including YSAS, so be sure to check her out!

I'm looking forward to checking out the other ladies' nails this week.  I'm certain there are more creative creations than mine!  You can find those manis via the thumbnails below.  As always, thanks so much for reading!

Tuesday, June 11, 2013

ABC Challenge: W is for Woven Nails


Hi there!  It's a late night here in Chicago and I should totally be in bed, but I just had to get my ABC Challenge post up.  Can you believe it's 'W' this week already??  Only 3 letters left, folks!  'W' was one of the letters I've had planned for awhile (wish I could say the same for 'X'!).  Back in school, I took a few weaving courses and found out that I really enjoyed it.  I even bought myself a tabletop loom after graduation.  I haven't used it in awhile so my skills are a bit rusty, but I hope you'll like what I've come up with for this week's Challenge.  I give you...Woven Nails!


I started with 2 coats of Sinful Colors in Unicorn.  Actually, this manicure started last night when I painted a ziploc bag with 2 large squares of China Glaze in Sunday Funday and Sinful Colors in Island Coral.  Those squares became, after they dried and were cut, the strips of polish I used to create the woven patterns on my accent nails here.  It's similar to what I did for my Viking manicure, only with less detail and more aggravation lol  I had planned to weave the pattern off the nail and then place the whole thing on while Unicorn was still tacky.  However, after a couple of tries, I found that placing the strips directly on my nails and weaving as I went worked better.


After admiring my work, my bf kindly pointed out, "They look prettier than I thought they would...but it took you 2 hours to do 2 nails!"  Oh, boys!  They just don't get it!

Please take the time to check out the other ladies' posts this week.  You can find them via the thumbnails below.  Thanks so much for reading!


Wednesday, May 8, 2013

ABC Challenge: R is for Rubik's Cube


Howdy, everyone!  I'm a late poster tonight.  I like to get my ABC Challenge posts up on Tuesday evenings but I was exhausted last night and had to wait to paint 'n' post until today.  Our letter this week is "R" and I thought it was going to be a super easy letter cuz everything starts with "R", right?  Yeah, not as many things as I thought and a lot of them were far too esoteric or general for nail art.  I surely could have grabbed a Revlon or a red and just done a swatch, but I wanted to do something more decorative this week.  So, after searching words that start with "R" via Google, I finally came up with Rubik's Cube!  I have a brother who can solve one of these in about 5 minutes; he says there's a trick to it, but I've never figured it out lol


Whaddya think?  I think they turned out really well and a good thing, too, since they took about 3 hours!  There was a lot of taping and striping polish used and, of course, after I started I realized there may have been an easier way to do it, but oh well.  It turned out in the end and that's all that matters ;)


For some reason, my camera didn't like the green I used (China Glaze's Four Leaf Clover) and it's showing up in these pics as more of a mint.  FLC is much more of a grass green, but you get the idea, I hope?


Thanks so much for reading and please take a moment to browse the other ladies' Challenge posts.  You can find them via the thumbnails below!

Polishes Used:
Sinful Colors~Snow Me White
Deborah Lippmann~Edge of Glory
Wet 'n' Wild Wild Shine~Red Red
Sally Hansen Insta-Dri~Orange Impulse
Sinful Colors~Pull Over
China Glaze~Four Leaf Clover
Sinful Colors~Endless Blue

Thursday, April 25, 2013

JulieG's Frosted Gumdrops Collection


Howdy, everyone!  I had planned a completely different manicure to blog about today, but after I got finished with this one, I just had to show it off!  There was a really great Groupon deal a few weeks back for the new JulieG Frosted Gumdrops Collection.  I was lucky enough to snag one of these which included all six of the polishes for $12.99 plus $2.99 shipping.  It was a pretty good steal!  I'm actually unfamiliar with JulieG's polishes as I believe they're only sold at Rite Aid and there aren't any of those around here.  So, I have to say, I was pleasantly surprised with these.

 *All product was purchased by myself and all opinions are my own and unsolicited*


Julie G's Frosted Gumdrops are glitter polishes with a textured finish, similar to O.P.I.'s Liquid Sand polishes.  As pictured above from left to right, the polish names are Tangerine Dream, Sugar Rush, Hot Cinnamon, Crushed Candy, Blueberry Fizz, and Rock Candy.  And here's what I did with them:


I started with 3 coats of Hot Cinnamon on every nail but my ring finger.  I would have been fine with 2 coats, but I did the third just to make sure everything was covered.  On my accent nail, I did a striped rainbow with all 6 of the polishes.  I have to say, the sparkle on these is pretty spectacular!  I wish my camera would have captured it better.  You can definitely see the texture and it is really similar to the Liquid Sand polishes I've tried.

 *All product was purchased by myself and all opinions are my own and unsolicited*


 My one complaint on these polishes is that they seem to take a long time to dry, and, since you lose the textured effect with a top coat, there's no real way to speed it up.  Just be aware of the possible smudge factor if you get impatient with these.  I think the sparkle payoff was worth the extra dry time for sure.


I know there are folks who really hate the texture trend, but I kinda dig it.  It's something new and fun to play with.  Would I want to wear it every day?  No.  But it's fun for a change.  What are your thoughts on texture polishes?  Love them?  Hate them?  Tell me all about it!

Thanks so much for reading!

 *All product was purchased by myself and all opinions are my own and unsolicited*


Thursday, April 18, 2013

Summer Squares Geometric Manicure


Hi there!  How's everyone doing?  I spent a pleasant evening with a friend having dinner and catching a show.  We went to see American Idiot, which was actually a lot more fun than I was expecting.  If you're a Green Day fan, I'd definitely suggest checking it out.  I don't consider myself a huge fan (in fact, "Know Your Enemy" used to send me running from the pet store where I worked cuz I can't stand it), but the music was fun and the choreography was interesting. 

Anywho, on to what we're all here for; nails!  I am in love with my mani today.  I basically just grabbed a few colors and started painting without a specific end in mind, so I'm pleasantly surprised with how it turned out.  Take a look:


I started with 2 coats of Sally Hansen Insta-Dri in Orange Impulse.  OI is a "true" orange creme.  I think everyone probably has a different idea of true orange, but this one is as close as I've seen to my idea.  After OI dried, I taped off some square shapes and filled them in with Insta-Dri in Blue By! which is a lovely lake blue creme.  The next step was to tape off even smaller squares and fill them in with Insta-Dri's Fast Fuchsia, a bright pink creme with just a touch of purple to it.  My taping skills failed me a bit this time and my edges were a little wonky, so I opted to freehand some lines in with Orly Instant Artist in Yellow Submarine.


All of these Insta-Dri colors were ones I found at Dollar Tree and, as near as I can tell, they're all Limited Edition colors.  It's odd that I can't seem to find a lot about them online, as they're pretty colors, but no one really seems to have swatched them.  In any case if you see them, snag them, they're awesome!


I almost went back in with more tape to make everything "perfect" but, for some reason, I like the imperfection in the lines.  I actually feel a little Jasper Johns-y, though my colors are way off lol
 

I'm doing my best to bring in the summer with these colors, cuz Mother Nature seems to be having a hard time getting around to it this year.  I'm grateful we're not so flooded here in my neighborhood in Chicago because I know there are folks who have it much worse than me, but damn, I am tired of rain already.  I'm having a hard time remembering what that lovely, yellow, bright thing that usually hangs around in the sky is called...the sun, maybe?  Come back, Mr. Sun...the Windy City misses you!

Thanks so much for reading!

Saturday, March 30, 2013

The Inevitable Easter Manicure


Howdy, everyone!  Today has been kind of bittersweet for me.  It was my last official day working at the pet store.  I'm going to miss all the dogs and their owners a lot, but it was the right move for me.  I'll have a more regular schedule now with weekends off, which is pretty darn exciting.

Anyway, on to the nails!  I've got sort of an Easter skittles thing going on here, I think.  This was tons of fun to do, but it took f-o-r-e-v-e-r!  Hopefully, it was worth it.  What do you think?


I'm in love with the little chicks on my index fingers lol  They turned out so cute I can't stand it!  I'll put a polish list at the end of the post, it's too much to go into here.  My thumb and middle fingers are water marbled, which is what took so long.  I had to redo my left hand about 4 times!   I added some dots on top of the marble with a dotting tool.  I did the bunnies on my ring fingers with the same dotting tool which was also used for the dots on the "egg" (my pinkie nail).  For the zigzag on my pinkie and the edge of the eggshell on my index nail, I used pinking shears to cut pieces of tape.  Then, I placed the tape on my nail, painted over it and pulled it off while the polish was still wet.  


I have to say, I'm pretty proud of this one.  I sent my boyfriend a photo of it last night and his response was "Holy cow!"...if he's impressed, I know I've done a good job lol 

I hope you all have a lovely Easter, if you celebrate it.  If not, have a great Sunday :)  Thanks so much for reading, and don't forget to enter my Sinful Colors Giveaway!

Polishes used:
Base color, bunny face, polka dots~Sinful Colors-Snow Me White
Water marble, bunny nose & ears, polka dots~Sinful Colors-Soul Mate
Water marble, Easter egg base color~Sinful Colors-Orange Cream
Water marble, polka dots~Sinful Colors-Unicorn
Water marble, bunny base color, Easter egg zigzag~Sinful Colors-Sugar Rush
Water marble, polka dots~Sinful Colors-Candy Coated
Chick face~Sinful Colors-Pull Over
Chick beak~NYC-Times Square Tangerine
Chick eyes, bunny eyes~Wet 'n' Wild Wild Shine-Black Creme
Chick egg~O.P.I~White Shatter

Tuesday, March 19, 2013

ABC Challenge: K is for Klimt


Howdy, everyone!  I simply cannot seem to get more than two posts out a week these days..dunno what my deal is.  Anyway, to start my ABC Challenge post, I first have to send out a huge THANK YOU to Liz from A Mani Maniac.  Some of the girls from the Challenge participated in a secret St. Paddy's Day polish exchange and Liz drew my name and hooked me up with some fantastic goodies that will feature in future posts.  Thanks again!

On to today's manicure!  We're on to "K" in the ABC Challenge this week.  This was a tough letter for me.  I have very few polishes, either by brand or by name, that start with "K".  I decided to go with an inspired look and some nail art today.  One of my favorite artists is Gustav Klimt.  His colors, subject matter and symbolistic style appeal to me.  Many of you are no doubt familiar with The Kiss which is probably Klimt's most famous work.  If this is the only work you know from him, I urge you to Google him and check out some other images.  They're just beautiful! 

Today's manicure is inspired by Klimt's Hygeia.  A detail of a three part oil painting, Hygeia was unfortunately destroyed in 1945 during the final days of WWII when the castle where it was stored was burned by retreating SS troops to prevent it falling to Allied forces.  Nice little art history lesson for you.  War is bad, destroys pretty things!


Ok, on to the nails!


I'll include a polish list at the end of the post and I won't bore you with all the details here.  I'm pretty happy with how it turned out.  Is it immediately recognizable as Klimt-inspired?  Maybe not.  However, when you see the detail in Hygeia's  robes, I hope you can see where I was going with it.


The accent nail is inspired by her hair.


This was really a fun manicure and I was glad to have a chance to do some nail art! 

Polishes used:
Red, Red by Wet 'n' Wild Wild Shine~cherry red creme
Diva on the Dunes by Jessica~bright red/orange creme
Pull Over by Sinful Colors~bright yellow creme
This Is It by Sinful Colors~shimmery gold with holographic flecks
Black and Brown Sharpie

Please take a moment to check out the other ladies in the ABC Challenge.  You can find them via the thumbnails below!  Thanks so much for reading!


Tuesday, February 26, 2013

Geometric Manicure


Howdy, everyone!  I have a quick manicure for you all today.  I had limited access to polish while I was back in Kansas this weekend, but my flight yesterday was cancelled and I had an extra night with nothing to do, so I decided to give it a go with what I had. (I did make it back to Chicago today, in case you were wondering)  As usual when I take a trip home, I had to run out to Walmart to grab a couple of things.  We don't really have Walmarts in Chicago, so I never get a chance to buy any Pure Ice or NYC polishes unless I'm home.  I admit, I did take an unnecessary turn around the cosmetic department while I was there and I picked up a few things.  Here's what I did with a couple of them!


I started here with 3 coats of NYC 153 Midtown Mimosa, a bright yellow jelly.  Then, I used blue painter's tape (thanks to my stepmom, Sherrie!) to tape off some elongated triangle shapes.  I used NYC 152 Tudor City Teal to fill in the triangles.  TCT is a pretty turquoise color, I'm sure it's supposed to be a creme, but it does seem more like a jelly to me.  In any case, you can tell it's sheer because the color looks more green here due to the yellow showing through.  It doesn't bother me, I enjoy happy surprises like that.


I'm pretty pleased with how this turned out, even though my boyfriend hates it lol  It's hard to  get those triangles centered with tape and I think I did a pretty good job, darnit!  What do you guys think?

Keep an eye out for my next ABC Challenge post which should be coming up shortly.  As always, thanks for reading!

Monday, October 22, 2012

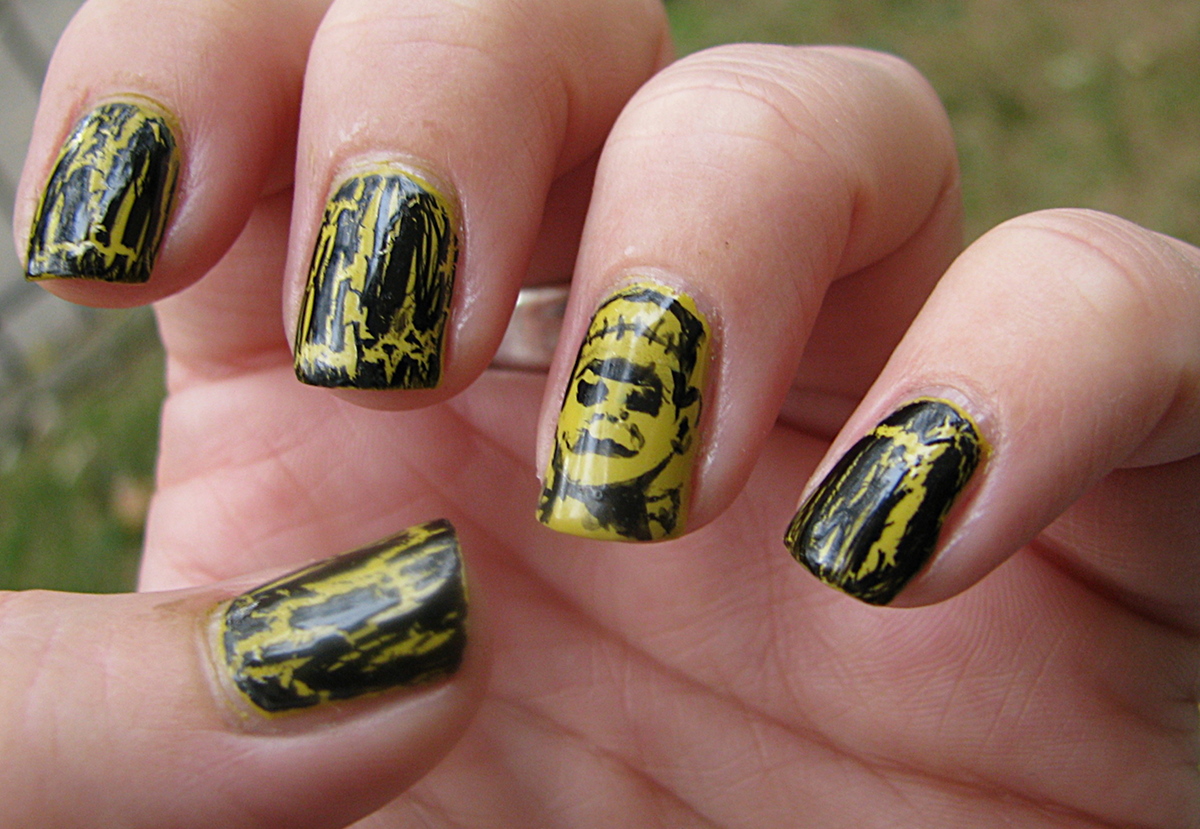
Nail-aween Challenge 6: Frankenstein Nails


Howdy, everyone!  Trying to get back into the groove of posting more regularly again, since I've been such a slacker lately lol  Halloween is fast approaching so I've got to get these challenge posts done!  Today's manicure is an answer to challenge 6 of the Nail-aween Challenge; Frankenstein nails.  I wanted to do something different than just green nails and black stitches, but, honestly, there's not a lot of new and different ways to do Frankenstein's monster.  He's so iconic that I just decided to showcase him.  Here's what I came up with:


I started with 2 coats of Julep's Alma-Trina Turk which is one of the polishes I received in my Trick or Treat box from them.  ATT is a very odd sort of color (perfect for Halloween) somewhere between mustard yellow and pistachio green creme.  Application was great, it was almost opaque in one coat.  I used O.P.I.'s Black Shatter on the rest of my nails.  The Monster's portrait was done in black acrylic paint.  I'm pretty happy with this although I wish I could have come up with something a bit more interesting for my other nails.  But, honestly, I was just kinda tired lol

Here's a close up of Frankenstein's Monster:


I'm hoping to get Challenge 7 done tomorrow, complete with a tutorial, if I have time and can figure it all out the way I want it.  So please check back in to see all of that!  Also, check out these other nail artists who are participating in the Nail-aween Challenge.  They are all awesome and deserve some love!
 
 
Thanks so much for reading!

Friday, October 5, 2012

Nail-aween Challenge 2: Matte Dotticure


Howdy, everyone!  Can I get a "hooray" for Friday?!  I had the day off today so I took myself down to my favorite brunch spot for some pecan apple pancakes and then to Target for some afternoon shopping.  And now I'm tuned into my favorite Friday night TV show...Ghost Adventures!  I may have mentioned that I love Halloween.  Well, I pretty much love anything spooky or supernatural.  GA is quality entertainment value, imho.  Zak, Nick and Aaron crack me up on a regular basis and I will admit I still can't watch the Bobby Mackey episode all the way through.  I'm so sad that I didn't know they were here in Chicago during the NATO summit.  It would have been worth facing the rioters to meet them in person :)

Ok, ok, on to the nails!  The second challenge for Nail-aween is a matte dotticure (I think it looks better spelled this way than "doticure", but I'm not sure which the correct way is?).   I remembered seeing a manicure awhile ago that used dots to a cute, spooky effect and so I decided to recreate it.  Take a peek:


I'm calling this the "I always feel like somebody's watchin' me" dotticure.  I started with 2 coats of MAC's Black Enough? which has a matte finish.  I used a larger dotting tool and Sinful Colors in Pull Over for the yellow irises then a small dotter and BE again for the pupils.  Aren't they cute??  Here's another look:


Unfortunately, I'll have to change these tonight as tomorrow is a K-State game and I can't jinx them with non-purple nails, but I wish I could wear them at work so I could get some folks' reactions.  I might have to redo this mani at a later date.

I will, of course, be posting the aforementioned K-State nails most likely tomorrow night.  I know I've done a couple of those already, but I love my Wildcats and tomorrow is a big game.  The Sunflower Showdown between K-State and KU is always a big deal.  KU isn't fantastic this year, but knowing the underdogs as we K-State fans do (because we usually are the underdogs), it would be stupid to underestimate them.  In any case, EMAW!

Thanks for reading!

Thursday, September 27, 2012

27 of 31: Nails Inspired by Artwork


Howdy, everyone!  Only 4 days left in the 31 Day Challenge!  Pretty crazy, huh?  Today's challenge was to be inspired by artwork.  My friend, Joe, went to Spain a couple of weeks ago and got to check out the Salvador Dali museum there.  Knowing my interest in jewelry, he brought me back a catalog of Dali's Jewels, a series of sculptures made out of precious metals and stones.  I hesitate to call them all jewelry as some of them aren't really meant to be worn, but they're all lovely.  While the photos in the catalog are spectacular, some day, I hope I'll get to see them in person.

I chose a particular piece from this collection as my inspiration.  The Royal Heart is a small gold heart with a miniature crown.  The center of the heart, a vertical rectangle has been cut out and in the space, an anatomical heart shaped out of rubies has been set.  The most amazing thing about this piece is that the ruby heart actually beats.  It's breath-taking to watch, almost creepy in a way.  I've tried to attach a video at the end of this post, so we'll see if it goes.  There's also a link, which I urge you to click so you can see the heart beat for yourself.  Here's my interpretation along with a picture of The Royal Heart:


Stunning, yes? (The Heart, not my manicure lol)  I started with a coat of Orly's Luxe topped with 2 coats of Oscar by Julep.  While that dried, I created some nail decals by placing dots of color on top of some saran wrap and left it to dry.  I made rectangle stencils with blue painter's tape and used a deep maroon O.P.I. whose name I don't know (obviously part of a mini set to which I don't have the packaging) to paint in the rectangles.  Once the decals dried, I cut them to fit the rectangles and fixed them to my nails with a coat of Seche Vite.  I added some yellow heart "jewels" in the center of each nail for some extra bling.


This challenge has been so fun (and exhausting) and I'll be a little sad when it's over (but not too sad).  I hope you all are enjoying it as much as I am.   Please tune in tomorrow to see some flag-inspired nail art!  Thanks so much for reading!

This *should* be the video of The Royal Heart beating.  Here's the link just in case this doesn't load the way I hope it will.  

Saturday, September 15, 2012

15 of 31: Delicate Print Nails


Howdy, everyone!  It was so great to have the day off today!  I took myself out to lunch and went on a Target run (picked up a couple of new polishes).  However, by the time I got home, I was feeling kinda cruddy.  I've been fighting off a cold or something most of the week, so I'm guzzling orange juice and trying to take it easy.

Anyway, on to today's challenge!  I'm still not really clear on what constitutes a "delicate print", but I did something that I think is cool and since it's my blog, that's what counts, right? :)


Believe it or not, I haven't actually done newsprint nails yet.  The process is pretty simple, you just dip your nail in rubbing alcohol and press a piece of printed newsprint onto it while it's wet.  For my manicure, I started with two alternating coats of Wet 'n' Wild's Wild Shine in French White Creme and Sally Hansen's Xtreme Wear in Sunny Side.  The white and the yellow kind of mixed into a milder tone of Sunny Side and I thought the effect was nifty.  After a coat of Seche Vite and some drying time, I did the newsprint process.  One pass wasn't enough for me, so I Seche'd again and added another layer of print and kept repeating that until I was happy with it.  I'm not sure if it meets the challenge, but I think it looks pretty cool!  Here's a closer view:


We're going tribal tomorrow, so please stop by to check it out...thanks for reading!

Wednesday, September 12, 2012

12 of 31: Striped Nails


Howdy!  Just a quick post today for the Challenge, stripes!


You can see I've got some wear on these already, the polishes I used are from a set I bought at Marshall's called Simply Sweet.  I know nothing about the brand, but I've worn it a couple of times and always get a lot of chipping really quickly.  Oh well.

 I started with 2 coats of Mac Vestral White for undies and then painted each nail a different color.  After that dried, I taped off some stripes and painted over it with Wet 'n' Wild's Wild Shine in Black Creme.  Super simple but I got more compliments on this manicure today than I've gotten in awhile, so it must pack a visual punch!

It's on to animal prints for tomorrow's Challenge, thanks so much for reading!

Sunday, September 9, 2012

9 of 31: Rainbow Nails


Howdy!  Today brings us Rainbow Nails.  I've done a few different variations of rainbows since I got into nail art, so I wanted to do something a little different than your standard "unicorn" rainbow of colors.  I also wanted something sparkly, so I come up with...wait for it...The Glitter Skittles Rainbow Manicure!  Ha!  I just love the way that sounds :)  I also thought I might called it The Dark Side of the Rainbow...but Glitter Skittles is more fun to say.  Here's a photo!

 Polishes used:
Red: Spoiled-Ants in My Pants
Orange/Copper: Spoiled-Cougar Attack
Yellow/Gold: e.l.f.-20417
Blue/Green:Milani Jewel FX-Teal
Purple: Sinful Colors-Frenzy

I thought this turned out very dramatic for a glitter mani.  I used a coat of Wet 'n' Wild's Wild Shine in Black Creme as a base color for all the glitters and then I just piled on the glitter until I thought I had good coverage.  Some of the polishes are 3 coats, some are 4 and some of them might even have 5 coats!  I tried the new peel-off base coat trick that I've seen floating around the blogs lately (for example Kayla Shevonne's tutorial here & Wacki Laki's here).  Basically, it's Elmer's glue.  It seemed to work pretty well, although I accidentally bought the Glue-All instead of the School Glue.  I think the School Glue might adhere a little less so I'll grab some at Target next time I'm there to compare the two.  One more shot:


Thanks so much for reading and tune in tomorrow for Day 10's Gradient Manicure!

Monday, September 3, 2012

3 of 31: Yellow Nails


Howdy!  Everyone in the States enjoying Labor Day?  I know I am!  I started with a trip to a local apple orchard with some friends to pick some of those crunchy delicious fruits.  It was a little frustrating, because of all the crazy weather we've had, the apple crop is really not great.  I managed to find a few, but the selection was nothing to what it was last year.  To make up for it, we stopped at Sonic...twice!

Anyway, on to the nails!  Today is Day 3 of the 31 Day Challenge and we have yellow nails as the manicure of the day.  Here are mine:


I'm not hugely thrilled with the way this turned out but, since I already have to plan for another mani tomorrow, I'm just gonna let it slide.  I used 3 coats of Jessica's Hype as a base color here.  I really need to flesh out my nude collection (pun intended), I only have two and both of them have a shimmer which isn't really what I wanted for this.  Oh well, we make do with what we have.  On top of Hype, I used Sally Hansen's Xtreme Wear in Sunny Side and my homemade dotting tool to make some bright polka dots.  I do think it's interesting that these dots are enough color that in the sunlight from farther away, it looks like my whole nail is yellow because of the color reflection off of the nude base.  So that's kinda neat, but overall, I think I need a little more contrast to pull this one off.

Tomorrow is green so I hope you'll stop by and check it out!  Thanks for reading!

Sunday, August 19, 2012

Scalloped Manicure


Howdy, everyone!  Just a really quick post, as I'm headed out the door for brunch at one of my favorite spots!


This is 3 coats of Unicorn by Sinful Colors, allowed to dry and used my craft scissors to cut up some scalloped pieces of tape.  Placed the tape and then applied a coat of Secret Peri-Wink-le by China Glaze.  This photo isn't a great representation of the colors.  The China Glaze has a bit more purple to it, but at least you can see the design.  I'm lovin' this one!  Can't wait to try with other colors and maybe with more colors on the nail together.

Be looking out for some great new manicures at Over The TopCoat!  I made another Ulta run on Friday and then, Saturday at work, a fantastically giving customer brought me some her own polish stash as a gift!  All in all, I think I have about 25 new shades to try out...it'll be a very exciting week for me!

Thanks for reading!