Showing posts with label Halloween manicure. Show all posts
Wednesday, October 30, 2013
Barielle Halloween Manicure Contest Entry
Heya folks! Hope everyone is ready for Halloween! I've got one last spooky manicure for the season. I've entered this one into Barielle's Halloween Manicure contest so you all know what's coming next lol If you'd like to vote for my version of Frankenstein and his bride, you can click here and "like" the photo. If you'd rather not vote, that's totally fine as well :) I hope you enjoy the manicure just the same!
I used all Barielle polishes for this one and, as I don't have very many and none in very "Halloween-y" colors, this was a bit difficult. I used Lemondrops, Purple Hearts, and Sweet Addiction. I'm quite proud of Franky, but I wish I'd have gotten more of the Bride's hair in there so you could tell better who she is. The rest of my nails are water marbled in different colors.
Voting is only open through Oct. 31st at noon, so I'm running pretty late with this one but I wanted to give it a shot nonetheless. Again, you can vote here by "liking" the photo...pretty easy, peasy!
Thanks so much for reading!
Sunday, October 13, 2013
Incoco Halloween 2013 Fright Night Collection
*Incoco nail strips received as a giveaway prize.*
Howdy everyone! So sorry I've been non-post status for a couple of days! Big things have been afoot, not only at Over the Top Coat, but in my personal life as well. Most everything has been good though, it's just been time-consuming and I've been too tired to stay up late and post like I usually do. However, I'm back and have lots of exciting things planned in the next few weeks...so yay! :)
To start, a few weeks ago, I entered Incoco's Pin to Win contest and won their new 2013 Fright Night collection! I've seen these nail strips popping up on lots of blogs lately and was very excited to have a chance to try them out. Plus, their Halloween designs are just so adorable, I'm thrilled to have the chance to give them a try! Today, I've got 3 of the 4 Fright Night designs to show you. I'm saving the forth for something later so, don't fret!
We'll start with the namesake of the collection, Fright Night! This pattern shows a silhouetted haunted house/cemetery scene on a glittery orange background. Classic, spooky Halloween and I love it! Incoco's strips are very similar, at least in my view, to the Sally Hansen nail polish strips. Like SH, these are actual nail polish formed into a strip, rather than plastic or some other weirdness. Because of this, they tend to stick better to the nail and have less issue with bubbling or creasing. The idea is to have the look of nail polish, without the cleanup or dry time of polish.
Application is fairly easy. There are 16 strips in each packet, divided into 2 sets of 8 different sizes. You select the size that you feel best fits your nail, peel off the clear cover and then peel the strip itself from the white backing. Carefully pull the silver tab off the end of the strip and then place it on your nail. There is some stretch to the strip, so you'll want to gently pull it tight across your nail and then press the strip firmly into place. Fold the end over the edge of your nail and file the edge lightly in a downward motion to remove the excess strip. If you have shorter nails, the strips are double-ended so you could use the excess on another nail if the fit is good.
According to the packaging and website, one Incoco nail strip manicure will last chip-free up to 14 days. I do wish I could test that for you guys, but I change my polish too often to devote 2 weeks to one mani. The designs do seem durable and last through showering, handwashing, and regular wear just fine. Incoco's strips do have the look of complicated nail art in under half the time which is pretty great. They also offer a wide variety of strips including pedicure and French manicure. So if you're like me and really hate painting your toenails, Incoco's strips could be a good solution.
The second manicure I have to show you uses Spooktacular (ghost pattern on thumb and pinky) and Bone-Rattling (skull pattern on index and ring finger). Both of these patterns glow in the dark. Unfortunately, my camera does not do well with capturing that effect so I don't have a photo to show but they do, indeed, glow!
I've talked a bit about what I like about these strips so let me tell you some of the things I'm not so fond of. First of all, the sizing seemed a bit large to me. I don't feel like I have super narrow nail beds, but only about 3 of the 8 sizes fit ALL of my nails well. So that means I have to make 6 strips fit all 10 nails unless I want to try to cut to size. I know Incoco is trying to fit as many people as they can with these, but a few more narrow sizes would be nice.
Also, since these are real nail polish, once you open the package that's pretty much it. The strips dry out in air and lose their ability to stick to the nail. I think you could probably figure out a way to use the extra by pressing them into wet polish or something, but the shelf life just isn't that great. One packet of nail strips is good for one manicure. And since I can use less than half of them, it seems a bit wasteful. Given the nature of the product though, I'm not sure how they could resolve that issue. Nail polish dries out in open air. If it didn't, none of us would be painting our nails at all and what a sad world that would be!
Overall, I do like these strips a lot. I think the adorable designs and variety of styles more than make up for the few issues I have with them. They're an especially great way to get the look of difficult nail art without the time, mess and fuss.
*Incoco nail strips received as a giveaway prize.*
Incoco's nail strips are price from $8.99 to $9.99 for one 16 strip set. Base coat and top coat are included in the strip so there's no need to use either. I typically do use a top coat however mostly out of habit, not for shine or durability. You can keep up with Incoco's news via their Facebook page or blog.
Have you tried Incoco's strips? What did you think of them?
Thanks so much for reading!
Howdy everyone! So sorry I've been non-post status for a couple of days! Big things have been afoot, not only at Over the Top Coat, but in my personal life as well. Most everything has been good though, it's just been time-consuming and I've been too tired to stay up late and post like I usually do. However, I'm back and have lots of exciting things planned in the next few weeks...so yay! :)
To start, a few weeks ago, I entered Incoco's Pin to Win contest and won their new 2013 Fright Night collection! I've seen these nail strips popping up on lots of blogs lately and was very excited to have a chance to try them out. Plus, their Halloween designs are just so adorable, I'm thrilled to have the chance to give them a try! Today, I've got 3 of the 4 Fright Night designs to show you. I'm saving the forth for something later so, don't fret!
We'll start with the namesake of the collection, Fright Night! This pattern shows a silhouetted haunted house/cemetery scene on a glittery orange background. Classic, spooky Halloween and I love it! Incoco's strips are very similar, at least in my view, to the Sally Hansen nail polish strips. Like SH, these are actual nail polish formed into a strip, rather than plastic or some other weirdness. Because of this, they tend to stick better to the nail and have less issue with bubbling or creasing. The idea is to have the look of nail polish, without the cleanup or dry time of polish.
Application is fairly easy. There are 16 strips in each packet, divided into 2 sets of 8 different sizes. You select the size that you feel best fits your nail, peel off the clear cover and then peel the strip itself from the white backing. Carefully pull the silver tab off the end of the strip and then place it on your nail. There is some stretch to the strip, so you'll want to gently pull it tight across your nail and then press the strip firmly into place. Fold the end over the edge of your nail and file the edge lightly in a downward motion to remove the excess strip. If you have shorter nails, the strips are double-ended so you could use the excess on another nail if the fit is good.
According to the packaging and website, one Incoco nail strip manicure will last chip-free up to 14 days. I do wish I could test that for you guys, but I change my polish too often to devote 2 weeks to one mani. The designs do seem durable and last through showering, handwashing, and regular wear just fine. Incoco's strips do have the look of complicated nail art in under half the time which is pretty great. They also offer a wide variety of strips including pedicure and French manicure. So if you're like me and really hate painting your toenails, Incoco's strips could be a good solution.
The second manicure I have to show you uses Spooktacular (ghost pattern on thumb and pinky) and Bone-Rattling (skull pattern on index and ring finger). Both of these patterns glow in the dark. Unfortunately, my camera does not do well with capturing that effect so I don't have a photo to show but they do, indeed, glow!
I've talked a bit about what I like about these strips so let me tell you some of the things I'm not so fond of. First of all, the sizing seemed a bit large to me. I don't feel like I have super narrow nail beds, but only about 3 of the 8 sizes fit ALL of my nails well. So that means I have to make 6 strips fit all 10 nails unless I want to try to cut to size. I know Incoco is trying to fit as many people as they can with these, but a few more narrow sizes would be nice.
Also, since these are real nail polish, once you open the package that's pretty much it. The strips dry out in air and lose their ability to stick to the nail. I think you could probably figure out a way to use the extra by pressing them into wet polish or something, but the shelf life just isn't that great. One packet of nail strips is good for one manicure. And since I can use less than half of them, it seems a bit wasteful. Given the nature of the product though, I'm not sure how they could resolve that issue. Nail polish dries out in open air. If it didn't, none of us would be painting our nails at all and what a sad world that would be!
Overall, I do like these strips a lot. I think the adorable designs and variety of styles more than make up for the few issues I have with them. They're an especially great way to get the look of difficult nail art without the time, mess and fuss.
*Incoco nail strips received as a giveaway prize.*
Incoco's nail strips are price from $8.99 to $9.99 for one 16 strip set. Base coat and top coat are included in the strip so there's no need to use either. I typically do use a top coat however mostly out of habit, not for shine or durability. You can keep up with Incoco's news via their Facebook page or blog.
Have you tried Incoco's strips? What did you think of them?
Thanks so much for reading!
Thursday, November 1, 2012
Nail-aween Challenge 10: Halloween Nails
Howdy, everyone! I'm a day late on this post. Time got away from me over the last couple of days. However, I do promise that this mani was finished and worn before the end of Oct. 31, 2012. Therefore, it still counts for the Nail-aween Challenge! The final challenge was to do any Halloween inspired manicure of your choice. Here's what I came up with:
I started with a gradient using Wet 'n' Wild's Wild Shine in Sunny Side Up and Sally Hansen's Complete Salon Manicure in Purple Pulse. When I got my Halloween Julep box this month, they sent me some free Halloween-themed nail decals from Alex Cole. This manicure seemed like a good time to try them out. So all the black silhouettes you see here are decals. I liked them, they were easy to use. However, a lot of the black ink seemed to rub off as I was working with them and they didn't actually stick to the nail by themselves. I'd recommend placing them onto an almost dry coat of polish or base coat so that the tackiness of the polish gives them something to stick to. On my thumbnail, I added some bat-shaped glitter from a Halloween-themed glitter kit I found at Michael's. I finished this manicure off with a coat of Flashy by Finger Paints, a holographic top coat.
This was a fun manicure, but I'm a little disappointed with how it turned out. Oh well, you win some, you lose some.
The Nail-aween Challenge was so much fun to participate in and I loved seeing what everyone else came up with. I'm hoping to find a holiday themed challenge to participate in during December, although where I think I'll find the time, I'm not sure. Please stop by the other challenge participants' sites to see how they completed their Challenges. You can find them here:
Tes Did It Nails
Sassy Paints
Nicole gets Nailed
glitznglammer
Finger Food
Wicked Tips
Fancy Schmancy Nails
Delight In Nails
Polish Groupie
My Nail Journey
Get Polished Up!
Just A Girl and Her Polish
Spellbound Nails
Le nail's corner d'Alex
Hello.Lacquer
Countess Nails
Color the world with polish
Nail Crime Nail Art
Coat of Mani Colors
Cutie Cuticles (nail art by Laraib)
Wacky Laki
Nail-Aween Nail Art Challenge October 1-31st, 2012
GLAMOROUS NAILS
Polish Gone Crazy
tragedystipsandtreats
Sassy Paints
Nicole gets Nailed
glitznglammer
Finger Food
Wicked Tips
Fancy Schmancy Nails
Delight In Nails
Polish Groupie
My Nail Journey
Get Polished Up!
Just A Girl and Her Polish
Spellbound Nails
Le nail's corner d'Alex
Hello.Lacquer
Countess Nails
Color the world with polish
Nail Crime Nail Art
Coat of Mani Colors
Cutie Cuticles (nail art by Laraib)
Wacky Laki
Nail-Aween Nail Art Challenge October 1-31st, 2012
GLAMOROUS NAILS
Polish Gone Crazy
tragedystipsandtreats
As always, thanks so much for reading!
Monday, October 29, 2012
Nail-aween Challenge 9: Pumpkin Nails
Howdy, everyone! Well, we're almost down to it...it's October 29th. I can't believe how this month has flown! This is the second to last Nail-aween challenge and it's pumpkin nails! I've seen quite a few really great pumpkin manicures the last couple of days. I decided to just run with a simple design on these. Whaddya think?
I started with 2 coats of Nicole by O.P.I. in My Lifesaver, a beautiful sky blue creme. I used Julep's Parker as a base color for the pumpkins and then topped it with KleanColor's Chunky Holo in Poppy for a bit of depth. Essie's Mojito Madness and Wet 'n' Wild's FastDry Sagreena the Teenage Witch make up the stems and leaves. I used striper polishes in white and black for the details.
All in all, I thought this turned out ok. Is it my favorite Halloween manicure? No. Was it fun to try something different? Definitely.
One more look at these guys:
And you only have a few more days to check out the other participants' work in this challenge. Here's the list again, please visit them and show 'em some love!
Tes Did It Nails
Sassy Paints
Nicole gets Nailed
glitznglammer
Finger Food
Wicked Tips
Fancy Schmancy Nails
Delight In Nails
Polish Groupie
My Nail Journey
Get Polished Up!
Just A Girl and Her Polish
Spellbound Nails
Le nail's corner d'Alex
Hello.Lacquer
Countess Nails
Color the world with polish
Nail Crime Nail Art
Coat of Mani Colors
Cutie Cuticles (nail art by Laraib)
Wacky Laki
Nail-Aween Nail Art Challenge October 1-31st, 2012
GLAMOROUS NAILS
Polish Gone Crazy
tragedystipsandtreats
Sassy Paints
Nicole gets Nailed
glitznglammer
Finger Food
Wicked Tips
Fancy Schmancy Nails
Delight In Nails
Polish Groupie
My Nail Journey
Get Polished Up!
Just A Girl and Her Polish
Spellbound Nails
Le nail's corner d'Alex
Hello.Lacquer
Countess Nails
Color the world with polish
Nail Crime Nail Art
Coat of Mani Colors
Cutie Cuticles (nail art by Laraib)
Wacky Laki
Nail-Aween Nail Art Challenge October 1-31st, 2012
GLAMOROUS NAILS
Polish Gone Crazy
tragedystipsandtreats
Thanks so much for reading!
Saturday, October 27, 2012
Nail-aween Challenge 8: Witch Nails
Howdy, everyone! I know it's late, but I really wanted to get this post up before I turn in. I've got a really cute manicure and it just couldn't wait til daylight! The next Nail-aween Challenge is Witch Nails. I dug around online and found a couple of fun ideas that I wanted to re-create. You can find one of the originals here and the other link just takes me to a tumblr page. If you know who's photo that is, let me know so I can give credit for the lovely artwork! Here's my take:
I decided to go with a bright green background, but I didn't want it to be a flat color so I started with 2 coats of Sally Hansen Hard as Nails in Limestone topped off with 2 coats of Electric Slide by Nina Ultra Pro. Limestone is a citrus-y green creme and Electric Slide has holographic and gold glitter suspended in a neon green base. I used black acrylic paint to create the witch profile on my thumb and the boots on my middle and ring fingers. The stripes on my other nails were done with a black striping polish. I finished off the look with boot button details in Orly's Luxe.
This is one of my favorite manicures so far from this challenge. The color combo is fun and striking and the artwork turned out so well!
...more after the jump...
Labels:
black,
Electric Slide,
glitter,
gold,
green,
Halloween manicure,
Halloween nail art,
Halloween nails,
Limestone,
manicure,
nail art,
Nail-aween Nail Challenge,
witch manicure,
witch nail art,
witch nails
Thursday, October 25, 2012
Nail-aween Challenge 7: Spider Nails + Tutorial
Howdy everyone! Goodness this month is flying by, isn't it? It'll be Halloween in less than a week! I'm going to show you my Nail-aween Challenge manicure and then I'm going to give you a tutorial on one of the techniques I used to get the look. The 7th Challenge is Spider Nails and here's what I came up with:
These didn't turn out quite the way I had hoped and I'm particularly unhappy with the orange spiders. But my blog is as much about my successes as my failures, so I'm putting it up here. I used Wet 'n' Wild's Wild Shine in French White Creme and Black Creme and then Julep's Parker for the spiders. Parker is a great orange creme for Halloween. Stay tuned after the jump for the tutorial on the background faux water marbling.
Monday, October 22, 2012
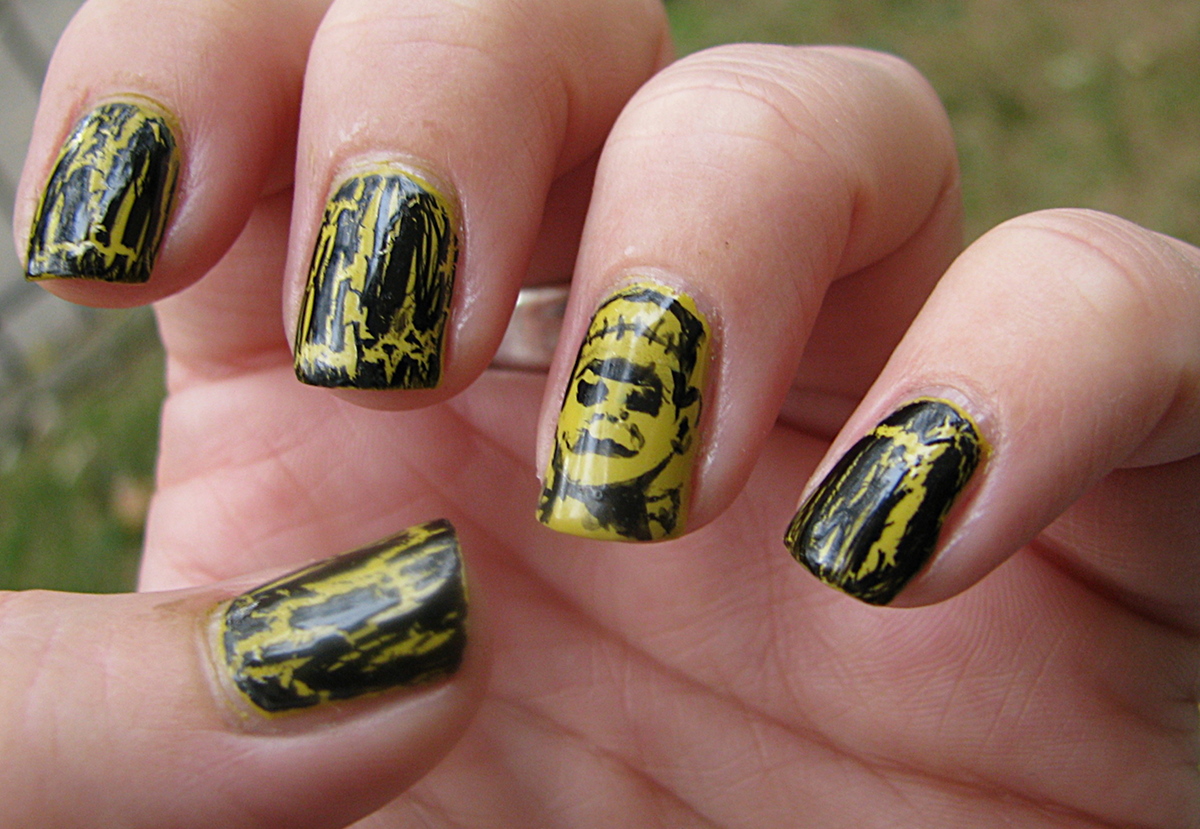
Nail-aween Challenge 6: Frankenstein Nails
Howdy, everyone! Trying to get back into the groove of posting more regularly again, since I've been such a slacker lately lol Halloween is fast approaching so I've got to get these challenge posts done! Today's manicure is an answer to challenge 6 of the Nail-aween Challenge; Frankenstein nails. I wanted to do something different than just green nails and black stitches, but, honestly, there's not a lot of new and different ways to do Frankenstein's monster. He's so iconic that I just decided to showcase him. Here's what I came up with:
I started with 2 coats of Julep's Alma-Trina Turk which is one of the polishes I received in my Trick or Treat box from them. ATT is a very odd sort of color (perfect for Halloween) somewhere between mustard yellow and pistachio green creme. Application was great, it was almost opaque in one coat. I used O.P.I.'s Black Shatter on the rest of my nails. The Monster's portrait was done in black acrylic paint. I'm pretty happy with this although I wish I could have come up with something a bit more interesting for my other nails. But, honestly, I was just kinda tired lol
Here's a close up of Frankenstein's Monster:
I'm hoping to get Challenge 7 done tomorrow, complete with a tutorial, if I have time and can figure it all out the way I want it. So please check back in to see all of that! Also, check out these other nail artists who are participating in the Nail-aween Challenge. They are all awesome and deserve some love!
Tes Did It Nails
Sassy Paints
Nicole gets Nailed
glitznglammer
Finger Food
Wicked Tips
Fancy Schmancy Nails
Delight In Nails
Polish Groupie
My Nail Journey
Get Polished Up!
Just A Girl and Her Polish
Spellbound Nails
Le nail's corner d'Alex
Hello.Lacquer
Countess Nails
Color the world with polish
Nail Crime Nail Art
Coat of Mani Colors
Cutie Cuticles (nail art by Laraib)
Wacky Laki
Nail-Aween Nail Art Challenge October 1-31st, 2012
GLAMOROUS NAILS
Polish Gone Crazy
tragedystipsandtreats
Sassy Paints
Nicole gets Nailed
glitznglammer
Finger Food
Wicked Tips
Fancy Schmancy Nails
Delight In Nails
Polish Groupie
My Nail Journey
Get Polished Up!
Just A Girl and Her Polish
Spellbound Nails
Le nail's corner d'Alex
Hello.Lacquer
Countess Nails
Color the world with polish
Nail Crime Nail Art
Coat of Mani Colors
Cutie Cuticles (nail art by Laraib)
Wacky Laki
Nail-Aween Nail Art Challenge October 1-31st, 2012
GLAMOROUS NAILS
Polish Gone Crazy
tragedystipsandtreats
Thanks so much for reading!
Labels:
black,
Frankenstein,
Frankenstein's monster,
green,
Halloween,
Halloween manicure,
Halloween nail art,
Halloween nails,
Julep,
manicure,
nail art,
Nail-aween Nail Challenge,
O.P.I.,
shatter,
yellow
Tuesday, October 16, 2012
Nail-aween Challenge 5: Ghosts & Goblins
Howdy, everyone! I know it's been a few days since I posted but I've had a bit going on. Nothing I want to share just yet, but who knows what the future will bring? :) Anyway, I'd been wearing my Game Day Manicure from Saturday until today which was just no good! I had to change it up so it was on to the next Nail-aween Challenge, Ghosts & Goblins. I racked my brain to come up with something fun and different for this one. I knew I didn't want "bed sheet" ghosts, not that there's anything wrong with them but I wanted something spookier. I also wanted to incorporate a bit of the goblin aspect, too. Here's what I came up with:
...more after the jump...
Subscribe to:
Posts (Atom)


