Pages

Showing posts with label Essie. Show all posts

Wednesday, February 26, 2014

Green Jelly Sandwich Manicure

*All products mentioned purchased by me. Unsolicited review*

Good evening folks!  I've got a quick manicure to show you today so let's just get down to it!


I was in the mood for something bright and sparkly.  The dull winter weather lately has gotten me down and I'm just ready for spring!  To brighten up my nails, I started with 2 coats of Essie's Shake Your $$ Maker, a grass green jelly. 
 

After SY$$M dried, I applied 1 1/2ish coats of Lost Without My Blogger from LynBDesigns.   I love this polish!  Bright green and sage green dots, large white and metallic hexes, and various other hexes in greens, white and metallic all jumbled together in a bright green base...it's so spring-y!  It also has an easy application and great coverage.
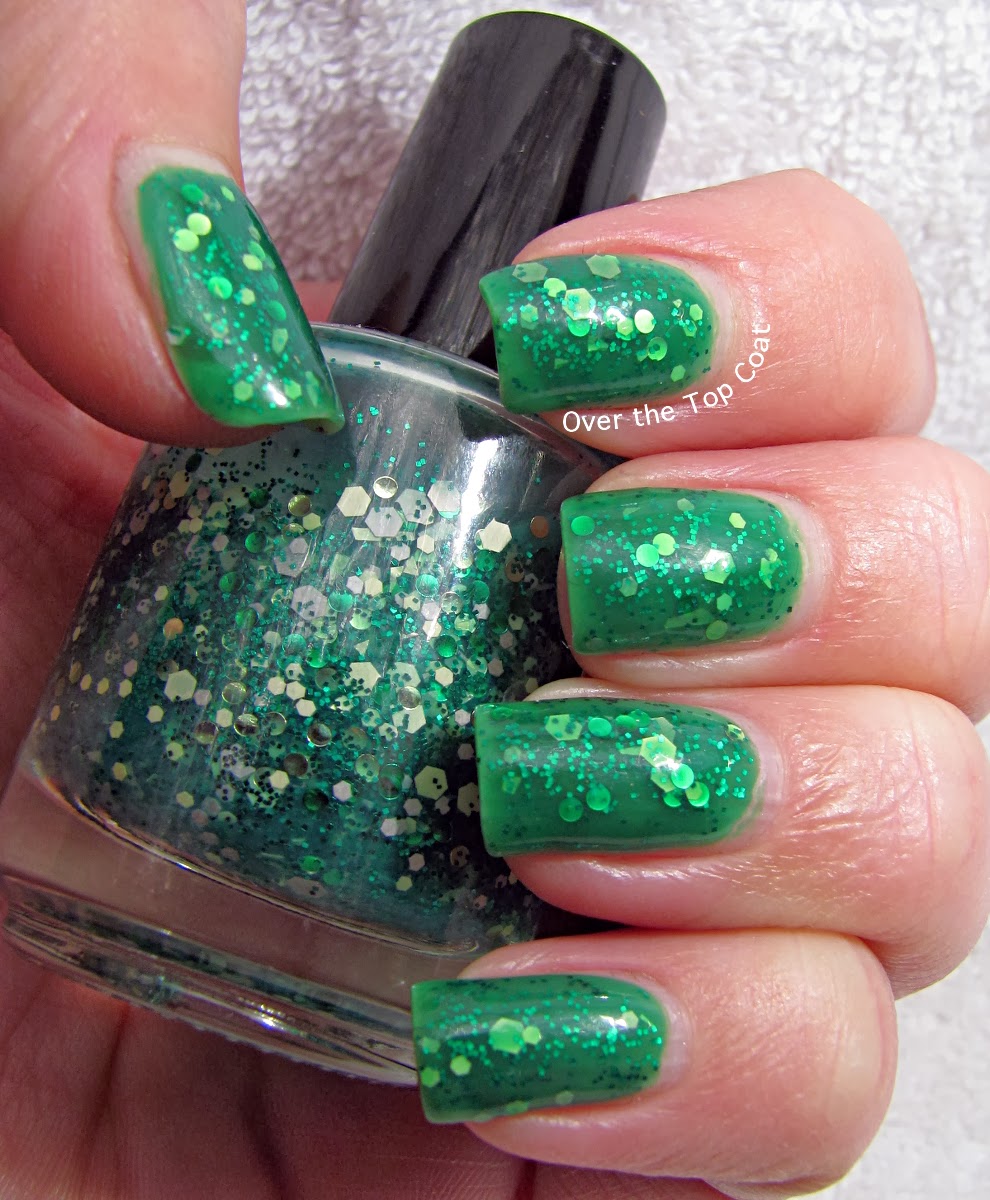

After LWMB dried, I applied one more coat of SY$$M to complete the sandwich.  I'm totally digging how this turned out!  Squishy jelliness and glitter is a sure fire combo!   I'm not sure if SY$$M is still available in current Essie displays, but a quick search online should land you several options to purchase it if you're interested.  LWMB is currently available on Etsy for $8 for a full size bottle.  Be sure to stop by LynBDesigns' Facebook page to keep up with new products, sales, and other important info!  Check out her adorable new logo while you're there!

Thank you all for reading!

Wednesday, September 11, 2013

Mish Mash Challenge: Least Expensive Polish


Happy Wednesday, darlings! (Sorry, I'm watching Bedazzled and Elizabeth Hurley is wearing off on me, I guess)  It is, in fact, that fabulous middle day of the week, also known as Hump Day and you know what that means; it's Mish Mash Challenge Day!  I don't mention it every week, but the Mish Mash Challenge is open to anyone who wants to join.  We're a super laid back group and there are a very few rules to follow, so if you're interested, add a comment to this post and Kimber will get you rolling!

On to this week's Challenge.  I took the "Least Expensive Polish" challenge a couple of different ways.  It could mean the least expensive retail-wise polish or it could mean the polish that I personally paid the least amount for.  I kind of combined both of these into my mani for the week.


I started with 2 coats of Sally Hansen's HD Hi-Definition Nail Color in Hue.  This polish has been sitting on my untried shelf for awhile and, since I snagged it in a huge Ulta clearence sale for $0.49, I figured it fit the "least expensive" bill quite nicely.  Hue is a pretty color, a buttery gold with a sparkly gold shimmer.  I never really understood what was so "Hi-Def" about this line from SH.  I've got a couple of them, but they're basically just nice shimmery colors, nothing too effect-y about them.  But pretty, nonetheless!


I decided I wanted to try a new-to-me technique to spice up this manicure a bit.  Fan brush manicures are something I've seen done much more successfully than I've managed here lol  The theory is easy; take a fan brush, dip it in polish and brush it over your nails.  What you don't know until you try, is how difficult it is to get the *right* amount of polish on the brush!  Too much and you just make a mess, too little and it doesn't transfer to the nail at all.  I don't hate it for my first attempt, but it's really not my favorite effect ever.  I used Essie's Saturday Disco Fever (which I won in The Nail Files giveaway a few weeks ago, again fulfilling the "least expensive" challenge) and Sinful Color's Burning Bright (SC polishes are always cheap at Walgreen's and I believe I snagged this one during one of their $0.99 sales). 


Here's a shot of my bottle of Hue, with that lovely clearance sticker on the front.  Marked down from $5.79 to $0.49...pretty good deal!

Please take a run through the other Mish Masher's posts this week.  I can't wait to see what they all come up with!  You can find their posts via the thumbnails below!

Also, don't forget to enter The Nail Files Turned 2! giveaway!  There are 14 great prizes from Taneja’s Bride, Accio Lacquer, My Boyfriend Hates Makeup, A Polish Playground, Mandie’s Manicures, An Accent Nail, Nail Addicted Sisters,  Galactic Lacquer, Pretty Jelly, xo, noelle and myself :)  Thanks so much for reading!

Friday, August 9, 2013

Essie: For The Twill Of It


Howdy everyone!  It's Friday already!  Can you believe it?  I've got to work tomorrow anyway, but am planning to spend a relaxing evening in the park, listening to some music with good friends so that will make up for it.  I managed to get my lemming of the week out of the way early, so I thought I'd show her off here.

Unless you're not into polish (which, in that case, I'm not sure why you're here) or have been living under a rock, you'll know about the buzz that Essie has created with their Fall 2013 For the Twill of It Collection.  The namesake polish is mostly what's creating the buzz so I knew I had to have it.  Two quick Ulta stops later (the first store was out...thank goodness for multiple Ultas!), it's mine.


For the Twill of It is a purple/green/teal/silver multichrome polish and the bane of nail blog photographers everywhere!  The formula on FtToI is beautiful!  Smooth and creamy, opaque in 2 coats, it's fantastic!  I know some Essies have had a reputation for being troublesome, but this one's a dream!  And the color...sigh...the color.  I'm pleased to say that the bottle shots I saw of this are not doctored to high heaven.  The polish looks great in the bottle and great on the nail.  Not so great in my photos.  My camera just isn't able to catch all that gorgeous multichrome shift, but it's definitely there.
 

FtToI is touted as a dupe for O.P.I.'s Peace, Love & O.P.I. and I did compare them in store.  They look spot on, but I'm not sure how they'll compare on the nail.  I can tell you that I'm happy enough with the Essie that I can't imagine needing the O.P.I. as well so I didn't grab it.

Have you bought any of Essie's new collection yet?  I almost picked up Cashmere Bathrobe as well, but decided against it at the last minute.  I'm just not quite ready for the darker colors of fall yet.  I've still got a zillion untried summer polishes! lol 

Thanks so much for reading!

Tuesday, January 8, 2013

Pretty Glitter Manicure + Giveaway News


Howdy, everyone!  Once again, I've fallen behind in posting.  It's mostly laziness on my part; I'm having a hard time getting into the swing of things in the new year.  However, my fabulous boyfriend is cleaning my kitchen for me so I can get some stuff done online.  Isn't he great?

I have a really simple, but really pretty, manicure for you guys today.  Here's ya go:


 ....more after the jump....

Tuesday, September 18, 2012

18 of 31: Half Moon Nails


Howdy!  It's a half-moon manicure challenge today...here are mine!


Two coats of Sonia Kashuk's Rock Star to start.  I followed that with a gradient using Essie's Bangle Jangle and The Nailasaurus's Gradient Tutorial. When that was dry, I free-handed some half moons again in Bangle Jangle.  I got the idea from a photo I saw on Pinterest, but unfortunately, it wasn't linked back to the original website, so if you know who came up with this idea, let me know so I can throw some credit their way ;)

As always, thanks so much for reading and tune in tomorrow for Galaxy Nails (which I've already done twice for this challenge and may have to redo again tomorrow...the Force is not with me tonight, sigh).

Thursday, September 6, 2012

6 of 31: Purple Nails


Howdy, everyone!  I'm still keeping up with the 31 Day Challenge and we're on to Day 6.  Here's my take on Purple Nails:


This is my first attempt at a technique called one stroke painting.  I got the idea from this post on Lucy's Stash and did a little research on YouTube to find out how to do this technique.  It's relatively simple, but takes a bit of practice.  If you're interested in learning more, there are tons of videos out there, just google "one stroke painting".  

Here, I started with 2 coats of Essie's Bangle Jangle, a pretty grey lavender creme.  I painted the flowers using purple and white acrylic paint and topped everything with a coat of Seche Vite.  I'm pretty proud of this for a first attempt and I'm looking forward to trying this technique in some different colors.  Here's another look:


Thanks so much for reading and stop back in tomorrow to see some black & white nails!

Saturday, August 25, 2012

Saran Wrap Manicure


Howdy, everyone!  I hope your weekend is going well so far.  I managed to get today off and had brunch with my friend and her parents this morning.  I do so love brunch :)  I also got to try out a new (for me) polish technique this week:  saran wrap!  Here are my results!


 If you're not familiar with the technique*, a saran wrap manicure is similar to some wall treatments I've seen.  You apply your base color (here I've used Sonia Kashuk's Rock Star) and let it dry completely.  I used a coat of Seche Vite to speed it up.  Then you apply one coat of a different color on top (my mani uses Essie's Bangle Jangle).  While this coat is still wet, you use a small piece of saran wrap (cling film, plastic wrap, whatever your favorite term is), crunch it up and dab your nails.  The wrap picks up bits of the wet polish and creates a fun texture.  I actually did this second step twice, using Zoya's Neeka for a little bit of sparkle.  I'm enjoying this technique and would like to try it with different color combinations...maybe something a little less monochrome next time.  Here's another shot of my mani:
 

Thanks so much for reading!!

*I don't know who "invented" this technique as I've seen it on many different blogs lately.  If there's someone I should give credit to, please let me know and I'll be happy to add it in!