*All products purchased by me. Unsolicited review*
*Warning* The following images may induce heavy breathing, a racing heartbeat, salivation, and the compulsive urge to immediately give all your money to the amazing woman who creates these polishes. Seriously. These beauties are not for the faint of heart! I've been following The Devil Wears Polish on Facebook for a little bit now and finally made the budget work to try out a couple of her creations. I think folks in Canada may have heard my squeals of delight when I opened my package! Tami is the master of the linear holo, people. If her polishes don't make your eyeballs sweat a little bit then there is quite possibly something wrong with you. I will be saving my pennies from now on for these beauties because I must have all the holos!
Ok, now that I'm (mostly) finished gushing...let's get down to the pics!
Up first we have A Nice Chianti (I love her names as well!). ANC is a deep red wine polish with a strong linear holographic effect. I'm not sure I can emphasize enough how fabulous this polish is! The color is perfect for Fall; that plum-y magenta just sings of spiced apple cider, leaves crunching underfoot, and a nip in the air!
Opaque in 2 coats (shown here), ANC was smooth to apply. I did use a coat of Seche Vite on this, but only for durability, as the shine was evident pre-top coat. There was no dulling of the holographic effect with top coat.
*sigh* The macro of this makes me ridiculously happy. All that rainbow-y goodness bouncing everywhere!
If A Nice Chianti doesn't convince you to try The Devil Wears Polish, the second polish I have for you may change your mind.
Holo Be Thy Name...I think we need a moment of silence to truly appreciate this work of art.
Ok, now I'm gonna yammer on about it! Although there are barely words to describe this one. A silvery slate grey, HBTN is so full of linear holographic goodness it makes your nails look 3D! And yes, I realize that your nails are, in fact, already 3D but I hope you know what I mean by that! Those rainbows just jump off the nails and grab your eyes with a death grip...I could not keep my eyes off of my nails the whole time I wore it. Incidentally, if you plan on driving a lot, you might want to steer clear of this one ;)
As with A Nice Chianti, the formula for HBTN was smooth and opaque in 2 coats. I did wear one coat of Seche Vite with this one as well and, obviously, the holographic effect was not dulled at all.
And I missed out on the sunlight for ANC, but I managed to snag one for you guys of HBTN. Holy-mother-of-all-holos, Batman! Please don't wait on this one. You'll regret it forever if you miss out!
*All products purchased by me. Unsolicited review*
Both of these polishes, along with a cadre of others, are currently available on The Devil Wears Polish's Storenvy site. Mini bottles retail for $4-5 and full size are $8-11.50. Tami is currently updating her Aspiring Anarchist collection, an LE set of glitter toppers and glitter crellies/jellies inspired by early punk bands, and has indicated that she'll be creating and stocking more holos in the near future. As she's so good at it, I suggest you follow her on Facebook because you won't want to miss any updates!
Thanks so much for reading!
Showing posts with label silver. Show all posts
Monday, October 7, 2013
Monday, April 29, 2013
Sinful Colors Diamond Lust Collection
Howdy, everyone! How was everyone's Monday? Mine was decent, got some very exciting nail mail to show you all later in the week. Today's post, however, came about because I was strolling through my not-so-local Walgreen's the other evening and came upon this display:
I couldn't resist, I bought 6! Shown above from left to right are: Queen of Deco, Crystal Clear, Gemtastic, Scene Stealer, Shine on Me, I Dream in Jewels, Rags to Riches, and Watch It Shine. The whole collection consists of colorful glitters in clear bases, though the glitters do vary from polish to polish.
I have one whole manicure to show you, featuring my favorite from the collection and then a single nail swatch of the other shades I purchased. Let's get started, shall we?
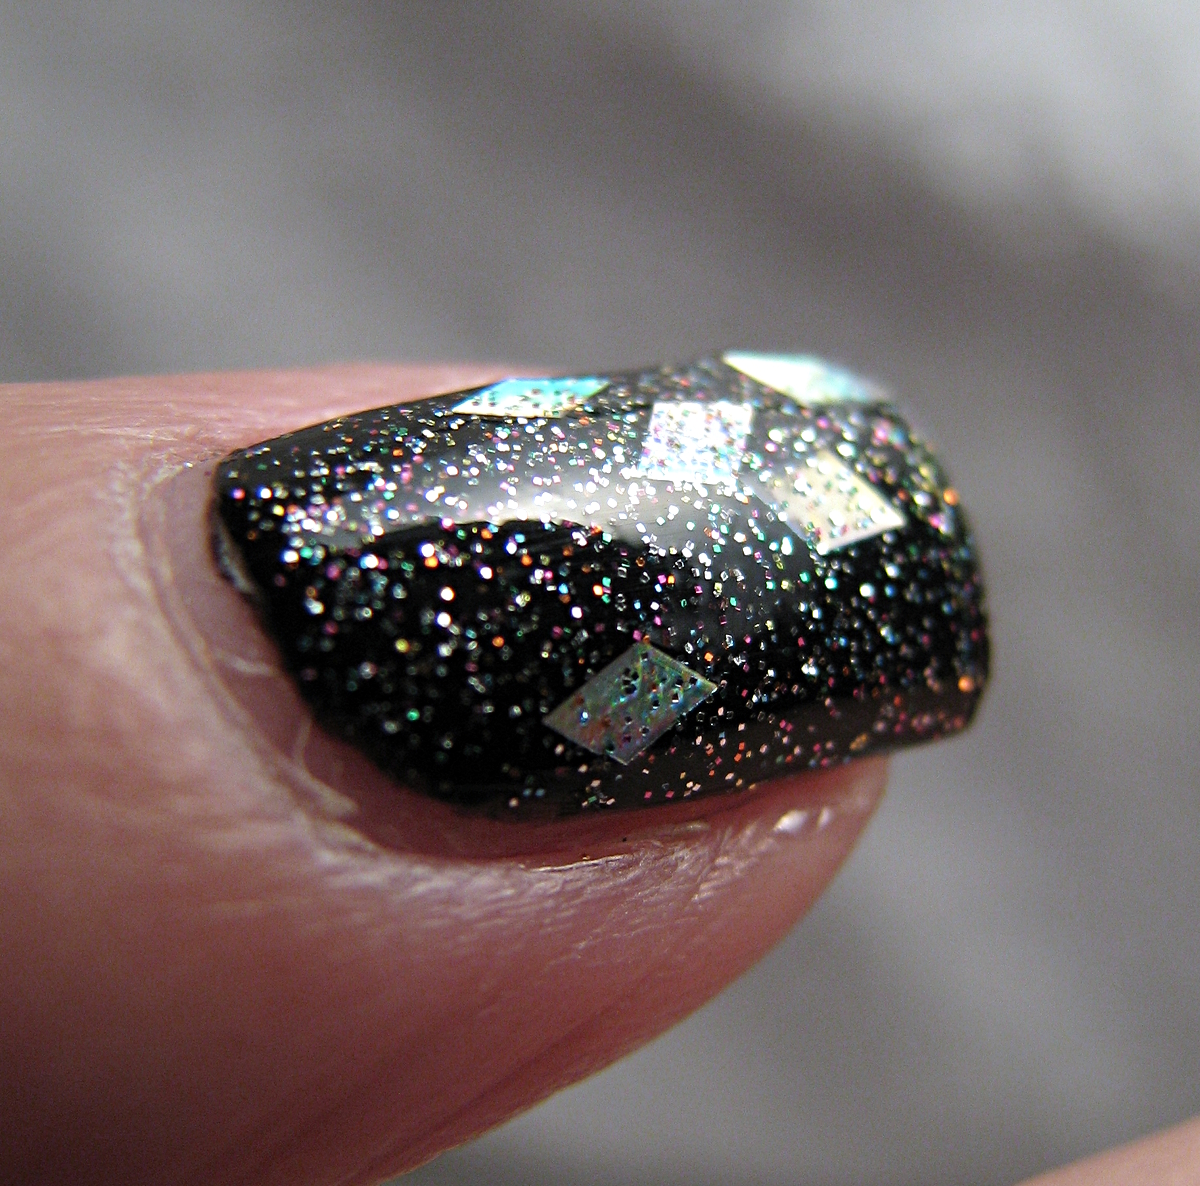
For my full manicure, I've topped 2 coats of China Glaze's Mahogany Magic with 2 coats of SC's I Dream in Jewels. IDIJ is a gorgeous gold and red micro glitter with larger diamond-shaped holographic glitter in a clear base. I have to say, on the whole, I'm really pleased with the amount of glitter in this collection. Most of the polishes had good coverage in 2 coats. IDIJ is totally packed with glitter and I love the color combo! My boyfriend said, "Wow! It looks like the Solid Gold Dancers!" and then proceeded to ask me if I knew who they were lol (note to my younger audience: do not ask me who they are, you'll make me feel old. That's what they invented Google for!)
I tried my best to get a good macro shot of each polish, I hope you can at least get the idea of what they look like!
Now on to the rest of the collection! (All SC Diamond Lust polishes shown in 2 coats)
Crystal Clear (shown over 2 coats of Deborah Lippmann's Edge of Glory) is chock full of holographic glitters in hexes, diamonds and bars. I didn't even see the bars until I got it on my nails. Application was good, although I did have to fish a bit for the diamond glitters. CC is a real show stopper; super sparkly and very interesting to look at.
Shine On Me (shown over 2 coats of Wet 'n' Wild's Tickled Pink) contains pink holographic diamond-shaped glitter, pink holographic and fuchsia micro glitter, and larger pink hexes. The color and glitter are great, but the formula on this one was a little gloppy for me. Maybe it's just my bottle, but I was less impressed with this one than some of the others in the collection. The smaller glitter is sparser than IDIJ, for instance, and the diamonds and larger hexes didn't want to spread nicely over my nail. It's still a lovely polish, but not my favorite.
Rags To Riches (shown over 3 coats of NYC's Tudor City Teal) is my second favorite of the collection. It's basically a green version of Shine On Me, with green holographic diamonds and hexes and green and gold micro glitter. The holographic finish on these glitters really pops! Application was good on this one and it spread out nicely over my nail.
Scene Stealer (shown over 2 coats of Wet 'n' Wild's Tickled Pink) seems to be the front runner as favorite of the collection judging from the blog posts I've seen so far. SS has pink holographic diamond-shaped glitters, small pink holographic hexes, and fuchsia micro glitter. It really is a pretty polish with plenty of sparkle. Coverage was good in 2 coats and application was great.
Watch It Shine (shown over 2 coats of Deborah Lippmann's Edge of Glory) is the second silver holographic topper of the bunch. Silver holographic diamonds and silver holographic micro glitter packed into a clear base, WIS is another stunner. The tiny glitters really look like diamond dust and I can see this one working over a lot of different base colors. Again, easy application and good coverage in 2 coats.
Sinful Colors Diamond Lust polishes retail for $2.99, which is $1 more than the regular collection. If you love glitter, these are totally worth it. I'm excited to have them all in my stash and am hoping to try out a few jelly sandwiches with them soon!
What do you guys think? Have you purchased any of these yet? I'd love to hear from you!
Thanks so much for reading!
Tuesday, January 29, 2013
ABC Challenge: D is for Dream On & Debris
Hi there, everyone! It's time for another ABC Challenge manicure! We're on to the letter "D". I think I missed the obvious "doticure" here when I was coming up with something to do. I decided to combine 2 polishes that start with "D" instead. Here's what I got:
....more after the jump....
Thursday, January 17, 2013
Julep Petra
Hello, everyone! I've got a quick swatch for you today of a very pretty Julep shade. Take a peek:
This is Julep's Petra, described as a "cranberry magenta with a silver shimmer" on their website. I swatched this not expecting to like it very much. Pinks and reds just aren't my thing and this polish seems to sit somewhere between the two. However, once I got it on, I saw the subtle purple and fuchsia tones as well as the silver. I was surprised at how much I ended up liking it. I'm wearing 3 coats here and I felt that was pretty good coverage. The formula was nice and the color payoff is great!
Here's another look:
You can see a bit of the silver shimmer in this one. Isn't it nice when things turn out better than you expect? And speaking of nice things, here's a reminder that my giveaway is still open so get your entries in for a chance to win 3 Julep polishes!
Thanks so much for reading!
Thursday, January 10, 2013
SMD-Revlon's Popular
Hello, hello! 4 days in a row of posting, it's almost unprecedented for me! I'm sure I'll lapse back to irregularity soon, so enjoy it while you can.
The polish I have for you today is a special one. If you've been reading my blog for awhile, you know that I lost a very good friend in November. Over the last few weeks, we "Chicago Girls" have been helping Shannon's parents clean out her condo and go through her things. Shannon had a love of fingernail polish, not as crazy as mine, but above average for sure. While organizing her place, we came across her stash, which I have now inherited. I've decided to do a weekly swatch or nail art with her polishes as a sort of tribute. Her taste in polish differed a lot from my own, so there are quite a few colors that I would not have purchased for myself...it'll be good to try something different and I think she'd like that they're being used.
So, my first SMD Stash manicure is with Revlon's Popular. Take a look:
....more after the jump....
Labels:
glitter,
manicure,
nail polish,
nails,
pink,
Popular,
Revlon Popular,
silver,
SMD,
sparkle
Friday, December 14, 2012
Silver and Gold Manicure
Howdy, everyone! Ah, Friday...the beautiful beginning to the weekend. That is, if you have a job wherein you aren't required to work weekends...I have such a job. But, at least it's a fun job!
I've got another holiday manicure for you today. This one is super sparkly and packed with holo goodness. Take a peek:
Silver and gold and glitter and holo, oh my! I started this manicure by just swatching 3 coats of China Glaze Angel Wings and Glistening Snow. These two polishes are part of China Glaze's 2012 Holiday Joy Collection and both are micro-glitters with a holographic punch. Angel Wings is the gold and Glistening Snow is the silver. Both of these applied easily with decent coverage on the second coat. Initially, I was going to leave this manicure as just the two polishes on alternating nails, but why stop there? I ended up doing glitter gradients on each nail. I paired O.P.I.'s Servin' Up Sparkle, a silver micro and hex holographic glitter in a clear base, with Angel Wings while Glistening Snow matched up with e.l.f.'s Gold Star, a large hex glitter in a clear base.
Here's another view:
I may have a holiday party to go to Saturday night, so I'll be sporting this glitter-fest because I think it's just perfect! What do you guys think?
Thanks so much for reading!
Labels:
Angel Wings,
China Glaze,
e.l.f.,
Glistening Snow,
glitter,
gold,
Gold Star,
holiday manicure,
holiday nails,
holo,
holographic,
holographic glitter,
manicure,
nail polish,
nails,
O.P.I.,
Servin' Up Sparkle,
silver
Tuesday, December 11, 2012
Two for One
Howdy, everyone! I know it's been awhile since I've posted, so I hope some of you are still reading. My life has been a bit of a whirlwind of late, so I haven't had the time to keep up with my blog. I had a few spare moments today, so I thought I'd show you a couple of manicures I've done in the last few weeks. Both of these manis are great for holiday wear.
The first manicure I have for you is really just a swatch of a new color I picked up at Walgreen's awhile ago. Here's a peek:
....more after the jump....
Saturday, November 3, 2012
Pigtails and Purple Nails
Howdy, everyone! College football season is really heating up and my Wildcats are still in the thick of it! They beat Oklahoma State today 44-30. It's really such an exciting and inspirational season for K-State fans and I can't wait to see what happens in the next month! But anyway, on to the nails, which is what you all are waiting for lol
Here I started with 2 coats of Purple Pulse by Sally Hansen Complete Salon Manicure. PP is a gorgeous purple frost with blue and red flecks. On my thumbnail, I used Wet 'n' Wild's Fast Dry in Stars & Stripes. My index finger is stenciled with Diamonds Are Forever by Revlon. I stamped and free-handed the "KSU" on my middle finger using Sinful Colors' Bad Chick. On my ring finger, I sprinkled purple flocking powder over a still-wet base coat and tamped it down so it would stick. The flocking powder is from Michael's Recollections line. And, finally, my pinkie has an animal print using Diamonds Are Forever again and a black striping polish.
I though this turned out really fun and you can't blame the slow start on me this time, as this was done Friday night long before midnight lol
Here's a shot of my right hand:
My cuticles are starting to get a bit ragged. I'm really kind of a slacker when it comes to taking care of them...I have to be more diligent about it or I'm gonna end up with sandpaper around my nails!
Oh! Here's a picture of my pigtails that I wear every game day as well:
Thanks so much for reading!
Thursday, November 1, 2012
Glitz-y Manicure
Howdy again, everyone! Two posts in one day...that's what happens when I get behind and then finally have some free time. This was the manicure I wore for Halloween. I went as a snow leopard and I know these nails really don't have anything to do with that, but they're so sparkly! Take a look:
How I wish there was a good way to take a photo of these lovelies. You can see a bit of the rainbow holographic effect here, but imagine that times 50. I dipped my still wet base coated nails into a pot of Wet 'n' Wild's Fantasy Makers Confetti in Glitz. I've done this as an accent nail before and knew I wanted to try it as a whole manicure because I was sure it would be stunning. I was not disappointed! It's gorgeous! It does look best in lower light, however, which makes it really difficult to photography. The sunlight takes out all the rainbow colors and it just looks silver. Still pretty but so off of how it really looks.
My next manicure will be another Game Day manicure, as my KSU Wildcats take on the Oklahoma State Cowboys to defend their undefeated status. I'm such a ball of nerves every Saturday now because every game counts!
Thanks for reading!
Sunday, October 21, 2012
Game Day Manicure
Howdy, everyone! I know I've been slacking on the posts lately, but I have a good excuse, I promise. It's just been a hectic few days and I haven't had time to polish my nails. *gasp* The horror! I've been wearing this manicure since Wednesday night, I had to plan ahead for game day this week because I had plans every night until tonight. Having a social life is tough! lol Anyway, these game day manicures have become a ritual and, as my Wildcats are still undefeated, I'm pretty sure they give that little extra oomph they need to win! Yes, I'm aware that it has more to do with Collin Klein's arm than with my nails, but superstitions are only weird if they don't work! So here's what I have:
I started with 2 coats of Wet 'n' Wild's Megalast in On a Trip, a dusky purple creme. My camera never really captures purple very well, this is actually much less blue than it shows up here, but you get the idea. On top of that, I applied 2 coats of Barielle's Purple Hearts, multi-sized purple and holographic hex glitters. Using Nailside's Explosion tutorial, I taped off a design. I painted on a clear base coat and then dipped my finger into a pot of Wet 'n' Wild's Fantasy Makers Confetti in Glitz. I've got to hit Walgreen's and get another bottle of that stuff; gorgeous holographic silver glitter! It's in their seasonal Halloween makeup aisle and I believe it retails for around $5. Good stuff!
A close up of my accent nail and you can also see Purple Hearts a bit better:
And one more shot for good measure:
I hope you enjoy my Game Day Manicures as much as I do! Tomorrow I'll have another Nail-aween Challenge mani for you, so be sure to drop by. Thanks so much for reading!
Saturday, September 22, 2012
22 of 31: Nails Inspired by a Song
Howdy, everyone!! I'm sorry, I'm just so excited so please forgive any excess exclamation points :) My Kansas State University Wildcats have beaten the Oklahoma University Sooners tonight in a magnificent football game! I know that 95% of you really don't care, but it's kind of a big deal and I just had to mention it here. Congrats, 'Cats!
On to the manicure, today we're inspired by a song. Because of the aforementioned game, I had to do purple nails, so I chose Wabash Cannonball as my song of choice. Wabash is the second fight song of the Wildcats and a personal favorite of mine. I did a little research into the song and found out it was written about a mythical train that, in hobo culture (yes, I said hobo culture), symbolized that last great ride, death. Yes, I know, a little morbid. You'd never know it from the song, I'll post a link to it at the end of the post. Additionally, the sheet music for Wabash was the only saved from a fire in the KSU music department in 1968, so it's come to stand for the fight and triumph of the underdog which is exactly what happened tonight! Here's what I came up with:
I know it doesn't look like much, but I was knackered when I was painting my nails last night so my creativity level was a bit low. I started with 2 coats of Wet 'n' Wild's Fast Dry in Buffy the Violet Slayer, a rich purple metallic, over a coat of Wet 'n' Wild's Wild Shine in French White Creme for undies. On my ring finger, I painted railroad tracks using French White Creme, Sinful Colors Smokin', Revlon's Diamonds Are Forever and black striping polish. I also used DAF for the french tips on my other nails. My pinkie is supposed to look like a train coming down the tracks toward you. I've included a closer image of both accent nails so you can see it a bit better.
Not my best work, but it was a fun idea anyway! Tomorrow's challenge is to be inspired by a movie, so stop by to check out what I come up with. Thanks for reading!
Almost forgot the links!
http://youtu.be/aZiQ89_s67Q : This is Johnny Cash's version of the song
http://youtu.be/cUjQ39eTQbk : And this is how we do it at K-State!
Friday, August 31, 2012
Magnetic Gradient Manicure
Howdy, everyone! The weekend is just about here (well it IS here for me, as I have today off). Any big Labor Day plans? I'll be headed out of the city with my girlfriends to go pick some apples on Monday. I love apple-picking and I really can't tell you why. It's probably more my love of road trips and hanging out with my friends more than anything, but it's definitely something fun to do.
On to my latest manicure!
This is a gradient manicure done with magnetic polishes. I had no idea such a thing could be done, but it's actually surprisingly simple and I thought the results were pretty good for my first effort. I only had 2 nails that were problematic and fortunately neither was on my photographed hand :)
I started with one thick coat of Ulta's Polar Opposites*, a teal sparkle magnetic polish. Then I applied my gradient of Ulta's Opposites Attract* (a deep purple magnetic polish with a silver sparkle), sponging it on just as I would for a normal gradient. Then, one nail at a time, I applied one coat of non-fast drying top coat. This will reactivate the polish already on the nail, thus allowing you to use your magnet! While the top coat was still wet, I used the striped magnet that came with Ulta's kit to do alternating diagonal lines on top of the gradient. I did this one nail at a time so the top coat wouldn't dry before I used the magnet. I let everything set for a bit and then applied a coat of my beloved Seche Vite. To my surprise, having the non-fast drying top coat on underneath the Seche seems to have given this manicure a bit more shine than usual. I'm going to have to try this technique on another mani and see if it holds true. It's one more step, but, hey I'm already putting 5 coats of polish on, what's one more?
I love learning new techniques and I'm thrilled to learn that magnetic polishes are much more versatile than I thought at first. I mean, once you've used a magnetic polish, it's cool at first but if it only does the one thing it gets a bit boring. It's good to know that I can use them more like regular polishes...I have a few ideas churning in my brain for some new manis now!
I hope everyone has a great Friday and, as always, thanks for reading!
*These two polishes came in a set with 2 others, I got the whole set at Ulta for $4.99.
Labels:
blue,
glitter,
gradient,
gradient manicure,
magnetic gradient,
magnetic polish,
nail,
nail art,
nail polish,
nails,
Opposites Attract,
Polar Opposites,
purple,
silver,
sparkle,
teal,
Ulta
Thursday, August 9, 2012
China Glaze Luxe and Lush
Howdy, all! Just a quick post tonight. I have a bunch of work to do before I can go to bed...including a new manicure after I take this one off! So, without further ado, here's what I've got on now.
I am so sad that there was no sun for outdoor photos today! I have a feeling this mani would have just lit up in sunlight. I had to content myself with taking indoor pics. I've decided in addition to the new camera I need, so better indoor lighting is also going on the "want" list. Anyway, back to my nails! I started here with one coat of CoverGirl NailSlicks in Midnight. This is an OLD bottle I've had for just about ever. I'm surprised the formula is still in decent condition! Midnight is gunmetal metallic-y glitter in a black base. The bottle describes it as sheer, but one coat is usually enough to cover for me. On top of that, I used one coat of Wet 'n' Wild's Fergie in Rock 'n' Roll. My final polish is China Glaze's Luxe and Lush from their Hunger Games collection. This was another score from my Ulta trip the other day. I've been looking for a bottle of this and was lucky enough to find it in their clearance section for $4.99 marked down from $8. Yay! Luxe and Lush is a flakie topcoat...the flakes are irregularly shaped and flash every color of the rainbow. I am so happy to have this in my stash!
After wearing this with a coat of Seche Vite, I decided to matte it out with Essie's Matte About You to see how it looked. Normally I love matte flakies, but I'm not wild about how this turned out. Maybe it's the metallic glitter underneath that's not working for me. Oh well, you win some, you lose some. I'm quite positive it will also take me about an hour to get all those different layers of glitter off my nails tonight lol
Thanks so much for stopping by!
Labels:
black,
China Glaze,
flakie,
glitter,
gunmetal,
luxe and lush,
manicure,
nail polish,
nails,
silver,
sparkle
Thursday, July 5, 2012
Sparkley Red, White, & Blue
Howdy and Happy 4th of July to all the U.S. readers! Independence Day is one of my favorite holidays...I mean, who doesn't love a government sanctioned day of blowing stuff up? I got to celebrate the day by going to see Magic Mike this afternoon. I liked the movie, I know it's getting some mixed reviews, but I found it entertaining. Could have used a bit more Dancing Channing, but certainly a fair amount of eye candy involved.
I started with 2 coats of Wet 'n' Wild's Fast Dry in Saved by the Blue; a bright royal blue shimmer. For the striped nails, I used my 1/4 inch art tape and taped off lines then painted Revlon's Diamonds Are Forever which is a super shiny silver metallic polish.
I also went to a White Sox game with my uncle and cousin who are in town...it was a fun time, but man! is it hot out there! I moved from Kansas to Chicago partly so I wouldn't have to endure 100 degree summers any more. How silly of me!
Anyway, on to the manicure for the day! Of course the 4th of July calls for something red, white, and blue with a good amount of sparkle thrown in. I found this mani from Nailside and decided to do a version of it myself. I think it turned out pretty well.
I started with 2 coats of Wet 'n' Wild's Fast Dry in Saved by the Blue; a bright royal blue shimmer. For the striped nails, I used my 1/4 inch art tape and taped off lines then painted Revlon's Diamonds Are Forever which is a super shiny silver metallic polish.
For the "fireworks" on my thumb and ring fingers, I tapped off sections and painted on a coat of Wet 'n' Wild's Wild Shine in Red Red, which definitely lives up to its name by being a true cherry red creme. While that was still wet and before taking the tape off, I added a quick layer of Julep's America-the Beautiful, a red, blue and silver glitter with silver stars. After that dried, I taped off another section and painted on Diamonds Are Forever. I topped those nails off with some stars from a Cina Nail Art kit and from Wet 'n' Wild's Fast Dry Stars & Stripes.
My pinky finger got some of the stars from the Cina kit as well and then I finished all the nails off with a coat of Wet 'n' Wild's Wild Shine in Kaleidoscope, a small holographic glitter in a clear base. Kaleidoscope is one of my favorites for a topcoat, it looks like a disco ball on your nails! In fact, if I didn't know or didn't care how difficult glitter is to remove, I might try to do enough coats of it to cover my whole nail. But I'm not sure I have the patience for clean up.
Sorry for the long-winded detail here. I keep this blog mostly for a record of the manicures I've done, so I know how I did them, in case I feel the need to recreate some of them in the future. I definitely appreciate everyone who comes to take a look and I hope you all enjoy reading my posts. However, I totally understand if all you do is look at the pictures lol In any case, thanks as always for stopping by!
Labels:
4th of july,
blue,
fireworks,
glitter,
holographic,
independence day,
nail art,
nail polish,
nails,
nailside,
red,
shimmer,
silver,
sparkle,
stars,
stripe,
stripes,
tape
Tuesday, May 29, 2012
Cute Chicks
Hello! I hope everyone had a lovely Memorial Day holiday. I've had a much needed two days off in a row and I've been using my free time to relax to the best of my ability :) In addition to relaxing, I finally got to try a product I've had my eye on for a long time! Sunday evening, I took a trip to Target. I was checking out the clearance end cap in Cosmetics and came across some Sally Hansen polish strips for roughly half price! I've wanted to try these strips forever, but have held off because I've been disappointed in EVERY other polish strip I've tried. They've either been difficult to apply or have not stayed put at all. I didn't want to fork over the $10 (approximate) for these if they didn't work out. So far, however, Sally Hansen's brand out-strips them all (if you'll pardon the pun)! Here's the result.
Cute little birdies! I'm pretty sure these are more of an Easter pattern (the strips are titled "Not a Peep"), but I thought they were adorable for any day wear. The strips have a silver background and the chicks are multicolored in yellow, pink, and blue. I chose to use the strips on just accent nails and painted the others with 2 coats of a franken between Sinful Colors Unicorn and China Glaze Solar Power. I was attempting to match the yellow on the birds themselves...not sure if I accomplished it exactly but I still like the outcome. Unicorn is an opaque light yellow and Solar Power has a bit more punch as well as a subtle shimmer. After a coat of Seche Vite on the yellow, I used my homemade dotting tool to create polka dots with Sinful Colors Folly (which is quite possibly my favorite pink polish ever).
There's a detail view of the chicks/birds. I'm never sure which direction to place designs on my nails. I tend to place things so that they're right side up when I look down on them. I figure I spend the most time looking at them any way, so I might as well get to see them the right way :)
I'm planning to put a top coat yet on the accent nails, I've heard that it helps the strips to last longer but I'm actually more concerned that the strips don't have a lot of thickness and my nails feel a little naked. After years of biting my nails and just general poor care, I'm still unused to their current length. I'm constantly worried that they're going to break like they used to, so an extra coat of polish helps me feel a bit more secure.
I hope you enjoyed this manicure and thanks for stopping by!
Sunday, May 27, 2012
Sexy Red Gradient
Hello and happy Sunday! It's currently 2 AM here in the Windy City and I'm asking myself why I'm still awake. The answer to that question will be revealed in the photos below! Today I have a manicure that I can only describe as 'sexy' :) I'm still in a gradient sort of mood and tonight I wanted to do something a bit on the darker side. Here it is!
Isn't it gorgeous?! I started here with two coats of Wet n Wild's Wild Shine in Red Red and it certainly lives up to its name as a very true red. I then sponged some Sally Hansen Diamond Strength in Chocolate Kiss, which is a darker red with some brown and pinkish tones. On top of that, I sponged a little Wet n Wild's Wild Shine Black Creme to add a bit more depth. After a coat of Seche Vite, I brushed on two coats of Wet n Wild's Fast Dry in Explosions After Dark. Wow! Explosions is my new favorite glitter! Medium sized black, silver and red glitter in a clear base, the only thing I didn't love about this polish was the finish which seems to be a semi-matte or satin. I don't think this finish shows off the glitter very well, so I topped it with another coat of SV.
I can't get over how wonderful this looks! Hopefully it's not just the sleep deprivation talking, but this manicure definitely ranks in my Top 5 favorites.
I won't be posting again until after Memorial Day so I hope this will tide you over until then. As always, thanks for stopping by and taking a peek at my nails!
Sunday, May 20, 2012
Confetti Manicure
Hello and happy Sunday! I hope everyone had a wonderful weekend. Today I have some more of the Wet n Wild glitters I bought last week to show you. I actually wasn't terribly wild about this manicure, but I got several compliments on it at work today, so I figured I'd go ahead and post it. Here it is!
This is a very super-sparkly manicure, there's no doubt about that! It kind of looks like I have disco balls on my fingers :) I started with 2 coats of Wet n Wild's Wild Shine in Bijou Blue and then I dabbed on two different glitters from the Wet n Wild's Fast Dry Sparks & Stripes collection: Light With Caution and Spontaneous Combustion. Light With Caution has large, coppery hexagonal glitter with smaller, square blue and green glitter mixed into a clear base. Spontaneous Combustion also has hexagonal glitter but in blue, green, purple, silver and gold. I tried to do an alternating gradient with these, although it doesn't show as clearly as I would like. Here's a detail view.
It is eye-catching, but I wish the gradient showed a bit more. In any case, I hope you enjoyed checking it out and thanks for reading!
Subscribe to:
Posts (Atom)


