Showing posts with label blue. Show all posts
Sunday, March 22, 2015
Indie Spotlight: Paint Shop Polish, May Flowers & In Bloom
Hello there! Yes, I know it's been ages and ages since I've posted. There are tons of excuses I could make, but what it boils down to is just feeling burnt out on blogging. There just came a point where all the swatching, photo editing, and writing just wasn't fun for a bit and I was all like "Blogging is hard!" so I took a break. But I'm dipping my toes back in the water, just to test it out. I can't promise regularity with posting but be sure to follow me on Facebook and Instagram (user name is @vashtiaa). I tend to post quick shots of current manicures on those accounts.
Alright, back to the point of today's post! Paint Shop Polish has a new spring collection coming out on Monday, March 23 and I was lucky enough to get to swatch a couple of pretties and I have some photos of those to show you today!
First up is In Bloom, an appropriately named floral glitter topper. Large iridescent lavender flower-shaped glitter swim in a clear base with smaller petal pink, daffodil yellow, and violet hexes, lilac squares, and a healthy sprinkle of holographic micro glitter. This is just a perfectly pretty spring mix!
I applied In Bloom first in one thin coat to spread out the holographic sparkle and then by dabbing the larger glitters on. The gradient underneath was created using Sinful Colors Unicorn and Out of Bounds. In Bloom was fairly easy to work with, the base is a good consistency; not too thick or gloppy. I did have to fish a bit for the larger flower glitters, but that's pretty much par for the course when it comes to big glitters. You'll also want a good top coat to smooth out any bumpiness from the glitter.
If you're a glitter topper fan, In Bloom is definitely worth a look. So pretty!
May Flowers is the second polish I have to show you today. We all know what a sucker I am for a good crelly and this one fits the bill! Icy blue iridescent flower glitters are accompanied by small hexes in the same shade and periwinkle hexes in a squishy white crelly base. This was my favorite of these two polishes...love the glitter mix and the base is beautiful!
No application issues to report, beyond the necessity to fish a bit for the larger glitters. I'm showing 3 coats here with one coat of Seche Vite on top. Really just a lovely polish!
May Flowers and In Bloom will both be available this Monday, March 23 on the Paint Shop Polish Etsy site. A 5ml mini bottle retails for $5.50 and a full size 15ml bottle is $10. Also, Candi is currently offering 15% off $15 with code PADDYS15 or free US shipping with a $25 order with code FREESHIP25. Both codes will expire on March 31st so don't wait!. Be sure to follow PSP on Facebook to keep updated on new products, sales, and other important info!
Thanks so much for reading! I hope you enjoyed this post and I'd love to hear from you in the comments section below!
Wednesday, April 2, 2014
Indie Spotlight: Above the Curve Nail Polish LE We Are The World
*We Are The World provided for honest and unbiased review. All other products mentioned were purchased by me.*
Hey there! I promised at the end of my last post that I'd have another Above the Curve polish to show you and I'm keeping my word! ATC is ever a brand for supporting charities and every once in awhile they come up with something extra special for a specific cause. Today's polish definitely fits the "extra special" bill!
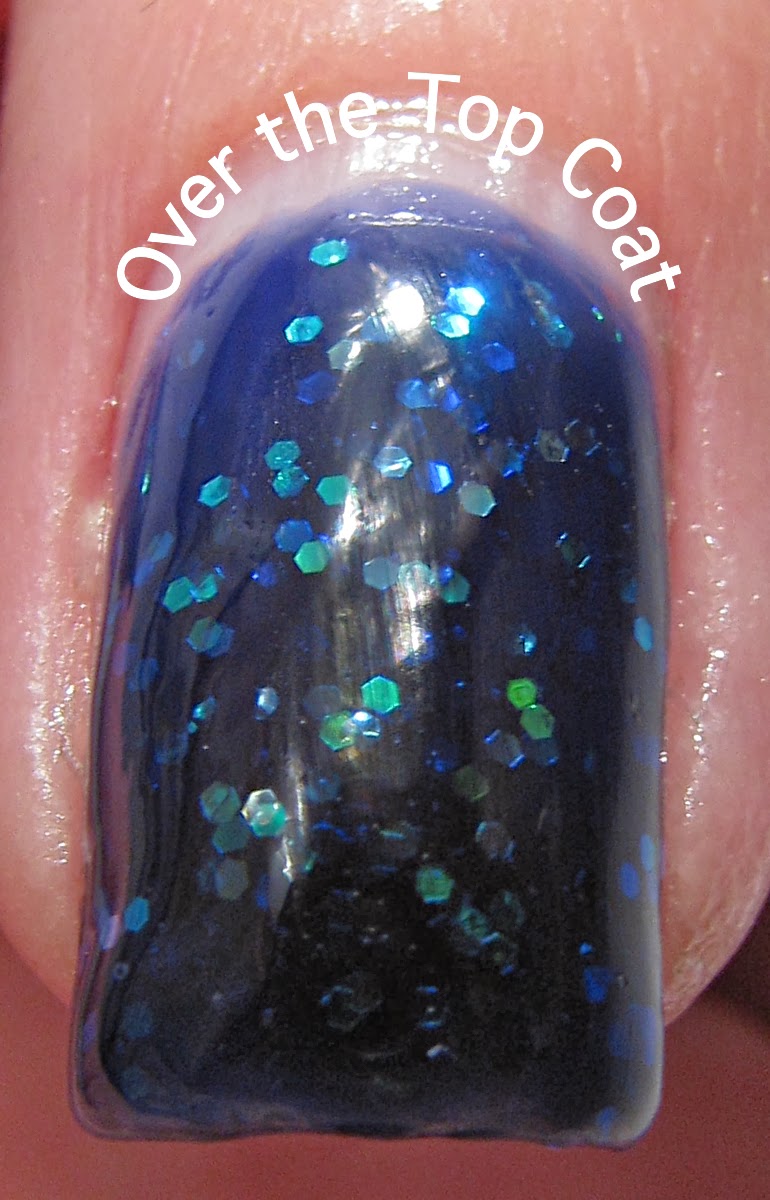
We Are The World is a Limited Edition polish made to celebrate Earth Day. I cannot even begin to describe the depth of love I have for this polish. I mean, just look at it! Is it not the perfect deep ocean blue? It reminds me very strongly of images captured of the Earth from space. Angel and Shawn have gone above and beyond with this beauty!
We Are The World is somewhere between a jelly and a crelly base (is there a name for this??) loaded with blue, green, and holographic glitters in different sizes and shapes, including my beloved dots! ATC could not have made me a custom polish more perfect than this one...deeply, beautifully blue with dots...simply perfection! The cerulean shade of this polish is similar to Sinful Colors Endless Blue, but does not have the nasty smell that I associate with that one.
The formula was also perfection, opaque in 2-3 coats and super smooth. You may have to do a bit of fishing for the large dots, but all the other glitters popped straight out of the bottle with no trouble. I'm showing 3 coats of We Are The World here with one coat of Gothic Gala Lacquers Smooth Me Over top coat and one coat of Seche Vite.
*We Are The World provided for honest and unbiased review. All other products mentioned were purchased by me.*
Not only is this polish special because of its beauty, it also has the distinction of being a charity polish for The Sierra Club Foundation. This Foundation is all about America leaving fossil fuels behind to replace them with clean energy (solar, wind, etc.) which makes it a perfect organization to support for Earth Day! Angel and Shawn are donating $2 of each bottle of We Are The World sold to The Sierra Club Foundation. You can purchase this polish (and all their other lovely creations) on ATC's Big Cartel site. We Are The World is a very reasonably $8.50 for a full size bottle...you really don't want to miss this one, folks! You can keep up with Above The Curve's Facebook page to keep abreast of new releases, swatches, and other good stuff!
Thanks so much for reading!
Hey there! I promised at the end of my last post that I'd have another Above the Curve polish to show you and I'm keeping my word! ATC is ever a brand for supporting charities and every once in awhile they come up with something extra special for a specific cause. Today's polish definitely fits the "extra special" bill!
We Are The World is a Limited Edition polish made to celebrate Earth Day. I cannot even begin to describe the depth of love I have for this polish. I mean, just look at it! Is it not the perfect deep ocean blue? It reminds me very strongly of images captured of the Earth from space. Angel and Shawn have gone above and beyond with this beauty!
We Are The World is somewhere between a jelly and a crelly base (is there a name for this??) loaded with blue, green, and holographic glitters in different sizes and shapes, including my beloved dots! ATC could not have made me a custom polish more perfect than this one...deeply, beautifully blue with dots...simply perfection! The cerulean shade of this polish is similar to Sinful Colors Endless Blue, but does not have the nasty smell that I associate with that one.
The formula was also perfection, opaque in 2-3 coats and super smooth. You may have to do a bit of fishing for the large dots, but all the other glitters popped straight out of the bottle with no trouble. I'm showing 3 coats of We Are The World here with one coat of Gothic Gala Lacquers Smooth Me Over top coat and one coat of Seche Vite.
*We Are The World provided for honest and unbiased review. All other products mentioned were purchased by me.*
Not only is this polish special because of its beauty, it also has the distinction of being a charity polish for The Sierra Club Foundation. This Foundation is all about America leaving fossil fuels behind to replace them with clean energy (solar, wind, etc.) which makes it a perfect organization to support for Earth Day! Angel and Shawn are donating $2 of each bottle of We Are The World sold to The Sierra Club Foundation. You can purchase this polish (and all their other lovely creations) on ATC's Big Cartel site. We Are The World is a very reasonably $8.50 for a full size bottle...you really don't want to miss this one, folks! You can keep up with Above The Curve's Facebook page to keep abreast of new releases, swatches, and other good stuff!
Thanks so much for reading!
Thursday, March 6, 2014
Drugstore Dime: Sally Xtreme Wear Indi-Glow
*Unsolicited review. All products mentioned purchased by myself.*
Hello everyone! I'd like to start this post with a big "THANK YOU" to everyone who voted for my manicure in Barielle's Mardi Gras Manicure Contest earlier this week! Because of you wonderful people, I won a $100 gift certificate which bought me 18 polishes! Three of those polishes will up for a giveaway that I'll be starting tomorrow to show my gratitude for your votes, so be on the lookout for that :)
Another quick announcement, as you may have noticed from the title of this post, I'm starting a new segment on my blog to specifically review drugstore polishes called Drugstore Dime. I know everyone loves indies and I do too, but I personally can't always afford to buy all the indies I want. There are lots of drugstore brands that I enjoy and so I thought, since I spotlight indies, I should probably highlight these brands as well. I included "Dime" in the title because, well, I'm broke lol
My inaugural Drugstore Dime post features Sally Hansen's Xtreme Wear in Indi-Glow, part of their Limited Edition Spring 2014 collection. Look at that bottle, how could I not pick it up?!? I'm loving that many of the drugstore brands are trying to emulate indies more and more, although they are not quite there in quality yet and I seriously doubt if they'll ever get there simply because of the cost issue.
Indi-Glow is a sheer purple base with some amazing color-shifting glitter. Shifting from bright green and blue to gold and deep indigo, these glitters are beautiful! The base builds up to a dark blue color but it takes a lot of coats. I'm showing 4 coats in these photos with one coat of Seche Vite. What I love about this polish is the color; it's like an alien night sky on your nails! I wish the glitter came out on the nail a bit more, but the squishy jelly texture definitely shines through. However, the formula is very thick and it took forever to dry. I had lots of issues with smudging on this even after I had let everything dry for a good half an hour. I'd recommend very thin coats (which is difficult given the thickness of the base) and lots of drying time in between coats.
I can't argue with the final result though. The color is stunning, especially in sunlight where those iridescent glitters sparkle and catch the light beautifully. It's nothing that you couldn't capture using different polishes in a jelly sandwich, but for the price, it's not bad. I snagged mine in a 2 for $4 sale at Walgreen's (which is still ongoing, I believe) and they regularly retail for around $3. I think Ulta's price is a little lower than that as well.
*Unsolicited review. All products mentioned purchased by myself.*
Overall, I like this polish. It's a bit troublesome but for $2, I can't complain too much!
I'd love your feedback on this new segment I'm trying out! Feel free to leave me a comment here or message me over on Facebook with comments or suggestions :) Thank you so much for reading!
Hello everyone! I'd like to start this post with a big "THANK YOU" to everyone who voted for my manicure in Barielle's Mardi Gras Manicure Contest earlier this week! Because of you wonderful people, I won a $100 gift certificate which bought me 18 polishes! Three of those polishes will up for a giveaway that I'll be starting tomorrow to show my gratitude for your votes, so be on the lookout for that :)
Another quick announcement, as you may have noticed from the title of this post, I'm starting a new segment on my blog to specifically review drugstore polishes called Drugstore Dime. I know everyone loves indies and I do too, but I personally can't always afford to buy all the indies I want. There are lots of drugstore brands that I enjoy and so I thought, since I spotlight indies, I should probably highlight these brands as well. I included "Dime" in the title because, well, I'm broke lol
My inaugural Drugstore Dime post features Sally Hansen's Xtreme Wear in Indi-Glow, part of their Limited Edition Spring 2014 collection. Look at that bottle, how could I not pick it up?!? I'm loving that many of the drugstore brands are trying to emulate indies more and more, although they are not quite there in quality yet and I seriously doubt if they'll ever get there simply because of the cost issue.
Indi-Glow is a sheer purple base with some amazing color-shifting glitter. Shifting from bright green and blue to gold and deep indigo, these glitters are beautiful! The base builds up to a dark blue color but it takes a lot of coats. I'm showing 4 coats in these photos with one coat of Seche Vite. What I love about this polish is the color; it's like an alien night sky on your nails! I wish the glitter came out on the nail a bit more, but the squishy jelly texture definitely shines through. However, the formula is very thick and it took forever to dry. I had lots of issues with smudging on this even after I had let everything dry for a good half an hour. I'd recommend very thin coats (which is difficult given the thickness of the base) and lots of drying time in between coats.
I can't argue with the final result though. The color is stunning, especially in sunlight where those iridescent glitters sparkle and catch the light beautifully. It's nothing that you couldn't capture using different polishes in a jelly sandwich, but for the price, it's not bad. I snagged mine in a 2 for $4 sale at Walgreen's (which is still ongoing, I believe) and they regularly retail for around $3. I think Ulta's price is a little lower than that as well.
*Unsolicited review. All products mentioned purchased by myself.*
Overall, I like this polish. It's a bit troublesome but for $2, I can't complain too much!
I'd love your feedback on this new segment I'm trying out! Feel free to leave me a comment here or message me over on Facebook with comments or suggestions :) Thank you so much for reading!
Wednesday, October 23, 2013
Mish Mash Challenge: Rainbow Nails
It's Hump Day! That means it's Wednesday! That means it's Mish Mash Challenge day! I skipped last week's challenge because I spent so much time on my Sanderson Sisters manicure, then I almost skipped this week because of another Halloween manicure I've been working on (which will also hopefully be posted tonight!), but I didn't want to skip two weeks in a row...especially on the Rainbow Challenge! I know there are going to be some stunning designs this week and I can't wait to see them! After all the nail art I've done lately, I just stuck with some simple skittles for this week's Challenge.
I did dress these up a bit by using linear holographic polishes so you get rainbows with your rainbows! Like I said, they're pretty simple but I like 'em! I'll list the polishes at the end of the post so you can check 'em out if you'd like to. Though I think a lot of folks were unimpressed with the China Glaze Holographics collection, the ones I've purchased (on half off of clearance at Sally's...woot!) are really pretty in my opinion. They aren't in-your-face crazy holos, but the linear IS there and it's quite nice.
I apologize for the lack of sunlight in these photos but that's been in short supply lately here in Chicago. If Apollo manages to drag his chariot into the sky tomorrow, I'll snap a quick one to show you the linear rainbows.
Polish List:
LynBDesigns~Am I Ginger?
DifferentDimensions~Tubular
China Glaze Holographic~Not In This Galaxy, OMG A UFO, Strap On Your Moonboots
Please take a minute to peruse the other Mish Mashers' work this week...I'm betting it'll be pretty! You can find them via the thumbnails below. Thanks so much for reading!
Tuesday, September 17, 2013
Mish Mash Challenge: Cold
Good evening everyone! I'm a late poster tonight, but I'm bound and determined to get my Mish Mash Challenge up before bed! This week the theme is "Cold". I went pretty literal with it this time around, as you can see from my inspiration photo below.
Looks kinda chilly, huh? I love the way the ice has layers of translucency and all the different shades of blue and white. So icy and pretty! Here's my interpretation:
I started with a coat of Sally Hansen Xtreme Wear in Pacific Blue (am I the only person who thinks this polish smells weird?) and then I used Sinful Colors' Tidal Wave, Sally Hansen Xtreme Wear in Deep Blue Sea and Breezy Blue, Barielle's Swizzle Stix, and Sally Hansen Diamond Strength in Something Blue to create the "icicles".
I'm so pleased with how this turned out. The blues are a bit darker than I wanted but, as you can see in the macro shot above, I captured the translucent nature of the ice pretty well (I hope!).
This *might* be my favorite Mish Mash mani so far! Please stop by the other Mish Mashers pages to see the fantastic manicures they've come up with for this week's theme! You can find them via the thumbnails below. Also, I'd like to remind you that there are around 2 weeks left to enter The Nail Files Turned 2! giveaway that I'm participating in, so get those entries in!
I'm also thinking about doing a Halloween/Fall themed giveaway in October. If you'd like to donate a prize, please shoot me an email at ndirks@hotmail.com. Any and all prizes, big or small, would be appreciated and you will get 2 Rafflecopter links to drive traffic your way as well. :)
Thanks so much for reading!
Friday, August 23, 2013
Born Pretty Store Review: Nail Art Foils
*Product provided by Born Pretty Store for honest review*
Happy Friday, everyone! I've got a whole lot of nuthin' planned for the weekend (with the exception of brunch with my girls on Sunday), which is just the way I like it! I might manage to get some nail-related things in there, too ;)
Today I have another Born Pretty Store review for you guys, this time with nail art foils. I hope you aren't tired of these reviews yet, cuz these foils are outstanding! Take a look:
I chose to review #21 from this set which has a pretty, bright blue to grass green gradient and a fractal pattern. The foil came in one long strip; 113 cm (44 inches) by 2.5 cm (just under 1 inch). The strip was packaged in a cute little plastic container with a lid. Following the directions on the website, I applied 2 coats of Deborah Lippmann's black Edge of Glory polish as my base. These foils were SO easy to apply. I cut the long strip into smaller pieces about 1.5-2 inches in length and then I used my Ciate nail foil glue rather than leaving my last coat of base polish tacky as suggested, which worked really well. On most of my nails, I was able to get almost ALL of the foil off. This created a cool kind of marbled effect with the base polish peeking through. I topped it all with a coat of Seche Vite to seal in the look.
You can see a bit of the fractal pattern in the macro shot above. I'm really pleased with these foils. It's only my second time using foils of any kind and, so far, I have to say that Born Pretty Store's are much better than the Ciate kit (you can read that post here) I purchased at Marshall's a couple of weeks ago. You do need to be careful when handling the foil, especially if you have wet nail polish on your nails. These will stick very quickly and don't offer a lot of wiggle room to redo a nail. You can reapply foil glue or polish and restick the foil on top of a mistake, but I think they look nicer when you do it all in one go.
*Product provided by Born Pretty Store for honest review*
These foils are $2.99 for the aforementioned 113 cm. strip. Shipping will cost a couple of bucks if you want registered mail. Otherwise, it's free if you want to take the risk of no tracking! And, if you use my code below, you can save 10% off of your total purchase. Pretty sweet deal, huh?
And a quick reminder about my 100+ Trifecta Giveaway. If you haven't entered yet (what are you waiting for??), you have 8 days left! Don't miss out on your chance to win 1 of 6 great prizes!
Thanks so much for reading :)
Happy Friday, everyone! I've got a whole lot of nuthin' planned for the weekend (with the exception of brunch with my girls on Sunday), which is just the way I like it! I might manage to get some nail-related things in there, too ;)
Today I have another Born Pretty Store review for you guys, this time with nail art foils. I hope you aren't tired of these reviews yet, cuz these foils are outstanding! Take a look:
I chose to review #21 from this set which has a pretty, bright blue to grass green gradient and a fractal pattern. The foil came in one long strip; 113 cm (44 inches) by 2.5 cm (just under 1 inch). The strip was packaged in a cute little plastic container with a lid. Following the directions on the website, I applied 2 coats of Deborah Lippmann's black Edge of Glory polish as my base. These foils were SO easy to apply. I cut the long strip into smaller pieces about 1.5-2 inches in length and then I used my Ciate nail foil glue rather than leaving my last coat of base polish tacky as suggested, which worked really well. On most of my nails, I was able to get almost ALL of the foil off. This created a cool kind of marbled effect with the base polish peeking through. I topped it all with a coat of Seche Vite to seal in the look.
You can see a bit of the fractal pattern in the macro shot above. I'm really pleased with these foils. It's only my second time using foils of any kind and, so far, I have to say that Born Pretty Store's are much better than the Ciate kit (you can read that post here) I purchased at Marshall's a couple of weeks ago. You do need to be careful when handling the foil, especially if you have wet nail polish on your nails. These will stick very quickly and don't offer a lot of wiggle room to redo a nail. You can reapply foil glue or polish and restick the foil on top of a mistake, but I think they look nicer when you do it all in one go.
*Product provided by Born Pretty Store for honest review*
These foils are $2.99 for the aforementioned 113 cm. strip. Shipping will cost a couple of bucks if you want registered mail. Otherwise, it's free if you want to take the risk of no tracking! And, if you use my code below, you can save 10% off of your total purchase. Pretty sweet deal, huh?
And a quick reminder about my 100+ Trifecta Giveaway. If you haven't entered yet (what are you waiting for??), you have 8 days left! Don't miss out on your chance to win 1 of 6 great prizes!
Thanks so much for reading :)
Tuesday, July 16, 2013
KBShimmer's Totally Tubular
I'd like to extend a big "hello" to all my new readers (and a fond "howdy" to those of you who've been in it for the long haul!). I do hope you'll stick around for awhile! To that end, I do have a bit of bribery to lure you in. Because of the great response to my Birthdanniversary Giveaway , Over the Top Coat now has more than 100 followers on Blogger...this means I'll be doing another giveaway! I'm hoping to have it organized by the end of the month, so if you don't win a prize in my current giveaway (accepting entries through July 18th), stick around to see what goodies I'll throw your way in a couple of weeks!
Ok, ok, on to the polish! KBShimmer is a fantastic indie brand that I'm sure many of you are familiar with. I don't own too many of them (too many lovelies, too little budget), but I couldn't resist snagging a mini bottle of Totally Tubular when I saw it in the sale section of her website. I'm a sucker for a good deal...and dots. Always the dots!
Totally Tubular is a beautiful turquoise-y teal crelly base with fuschia, aqua, and royal blue dots and micro glitter. The color combination here is superb. I could not stop staring at my nails all day! The blue in this polish is so perfectly summer!
I actually layered 2 coats of Totally Tubular over 2 coats of China Glaze Sunday Funday for this manicure, mostly because I was too lazy to take off a previous mani and didn't want it to show through. I'm certain TT would build up nicely on its own; the crelly was a nice consistency, not too sheer and not too thick. Application overall was a dream...I'm a bit sad that I decided on the mini instead of the full size lol
Do you guys own any KBShimmer polishes? What do you think of them?
Thanks so much for reading!
Thursday, July 4, 2013
Happy Independence Day! Or The Inevitiable July 4th Manicure
Hi everyone! May you all have a lovely 4th of July, if you live in the States....if not, have a lovely Thursday!
This is my stars and stripes manicure. Red, white and blue is such a classic combination, isn't it? :)
I've got a polish list coming, if you're interested! Stay safe and have a great holiday, everyone! Thanks for reading :)
Polish List:
Sinful Colors~Snow Me White
Pure Ice~Freedom
Zoya~Liberty
China Glaze~Ride the Waves
NYC~Big Apple Red
Wet 'n' Wild~Stars & Stripes
Wet 'n' Wild Fergie~Hollywood Walk of Fame
Labels:
blue,
independence day,
independence day manicure,
Independence day nails,
July 4th manicure,
July 4th nails,
manicure,
nail polish,
nails,
red,
stars,
stars and stripes,
stripes,
white
Sunday, June 23, 2013
Sunday Water Marble Blues
Howdy, everyone! Hope you all have had a great weekend. Mine has been lovely. Had a spa day with the girls yesterday and got a fantastic facial at Trump Tower Spa. Lest you think I'm all rich and fancy, we had gift certificates so my treatment with tip only cost me $12 out of pocket. Woot! It was a good day all around, plus my nails looked fab!
This is one of my favorite water marbles ever! I'm sorry the pics are a little dark. I've got a new lightbox (thanks, Dana!) and I'm trying to work out the lighting situation. Basically, my little lamp ain't cuttin' it anymore, I'll have to look into some better wattage.
Anyway, I started this marble with 2 coats of Orly's Snowcone (on 50% clearance at CVS!!) for my base color. I used Snowcone and Sinful Colors in Snow Me White and New Wave for the marble. This looked a lot like Sodalite IRL and I really loved the patterns that were created.
Thanks a bunch for reading!
Thursday, June 13, 2013
Different Dimension's Money
Hiya, folks! How's your day? It's been pretty good for me. It's amazing how a really good, hard work day can make you feel accomplished...especially when it means you get a 3-day weekend! Yep, today turned out to be my Friday, yay!
Anyway, I have a fun polish to show you! Different Dimension had a sale a couple of weeks ago to celebrate her impending (and, I'm positive, much deserved) vacation. I couldn't resist grabbing a few polishes, so here's a swatch of one of the ones I picked up!
Meet Money. Money is part of DD's Echoes collection, inspired by Pink Floyd songs. I pretty much love everything in the collection and once I saw Money's dots, I knew she would be mine! A white crelly chock full of holographic squares, gold and neon green hexes, small teal dots, and large teal, black AND holographic dots, this beauty made my heart go pitter-pat at first glance.
Look at all that dotty goodness! I love the color combination and the formula was flawless. Missi Barry, DD's maker, warns that the large dots might give some difficulty but I had no issues at all. I turned the bottle upside down between coats and those larger dots just jumped right to the brush and from there to my nails. I used 3-4 coats here, but you could definitely wear it over a white base for a faster payoff. I love the depth in these types of polishes, so I'm usually happy to work up the opacity.
If you get a chance, you should definitely give Different Dimension polishes a try. I've loved everything I've tried so far!
Thanks so much for reading!
Labels:
black,
blue,
circle glitter,
crelly glitter,
crelly polish,
Different Dimension,
Different Dimension Money,
dot glitter,
glitter,
gold,
green,
manicure,
Money,
nail polish,
nails,
swatch,
teal
Tuesday, June 11, 2013
ABC Challenge: W is for Woven Nails
Hi there! It's a late night here in Chicago and I should totally be in bed, but I just had to get my ABC Challenge post up. Can you believe it's 'W' this week already?? Only 3 letters left, folks! 'W' was one of the letters I've had planned for awhile (wish I could say the same for 'X'!). Back in school, I took a few weaving courses and found out that I really enjoyed it. I even bought myself a tabletop loom after graduation. I haven't used it in awhile so my skills are a bit rusty, but I hope you'll like what I've come up with for this week's Challenge. I give you...Woven Nails!
I started with 2 coats of Sinful Colors in Unicorn. Actually, this manicure started last night when I painted a ziploc bag with 2 large squares of China Glaze in Sunday Funday and Sinful Colors in Island Coral. Those squares became, after they dried and were cut, the strips of polish I used to create the woven patterns on my accent nails here. It's similar to what I did for my Viking manicure, only with less detail and more aggravation lol I had planned to weave the pattern off the nail and then place the whole thing on while Unicorn was still tacky. However, after a couple of tries, I found that placing the strips directly on my nails and weaving as I went worked better.
After admiring my work, my bf kindly pointed out, "They look prettier than I thought they would...but it took you 2 hours to do 2 nails!" Oh, boys! They just don't get it!
Please take the time to check out the other ladies' posts this week. You can find them via the thumbnails below. Thanks so much for reading!
Monday, May 27, 2013
Summer Gradient with Nail Pattern Boldness
Howdy, everyone! I hope you've all had a nice holiday here in the States. I have a quick, fun manicure for you today. I actually got this idea from The Polished Perfectionist so I can't say it's original, but I liked the look so much, I knew I had to give it a try!
I'm loving how this turned out! I used Sinful Colors in Innocent and Why Not for the gradient and then topped it with Flipping Out Hard by Nail Pattern Boldness.
FOH is a glitter bomb packed with tiny blue, green, and yellow neon matte glitters. I bought it because I think it looks quite a bit like Floam, which is a total lemming of mine. When I got the bottle from NPB, I was stumped at how to use it. I did try to build it up on its own, but didn't have as much success with it as I'd hoped so when I saw The Polished Perfectionist's post, I knew FOH was just perfect for this look!
What do you guys think?
Thanks so much for reading!
Labels:
blue,
Flipping Out Hard,
gradient manicure,
green,
green blue gradient,
Innocent,
manicure,
matte glitter,
Nail Pattern Boldness,
nail polish,
nails,
neon,
Sinful Colors,
summer gradient manicure,
Why Not
Tuesday, May 21, 2013
ABC Challenge: T is for Tiers of Teeny Tiny Triangles
Hi there, folks. I want to start my post tonight with thankfulness that my friends and family who live in Oklahoma are safe and sound. I know there are a lot of people who cannot say that today. It's unfathomable to me how those affected by the tornado must be feeling now and my heart goes out to them. It felt wrong not to acknowledge the awfulness that's happened, I hope you understand.
On to my ABC Challenge post for the week. Amazingly, we've come to 'T' in our traverse of the alphabet...I can't believe we're so close to the end! Much like 'R', I struggled with what to create for this challenge. There are ton of 'T's in the world, but nothing was speaking to me. I finally decided to keep it simple and go with some cute triangles.
I started with 3 coats of Sinful Colors Tidal Wave, a barely-there light blue creme and one of SC's new Sail La Vie collection polishes. I love the color here, but the formula was a bit streaky and draggy. It did even out after 3 coats, but I was a bit disappointed. It won't, however, stop me from blowing part of my paycheck on a few more polishes from Sail La Vie and their Pool Side Polishes collection as well.
After Tidal Wave, I used a pinking shears to cut into blue painters tape to create the triangles. The top tier of triangles were created with Sinful Colors Poudre, a light peach creme. The middle tier is Wet 'n' Wild Megalast in Club Havana, a light coral creme. The last tier closest to my cuticles is NYC's Times Square Tangerine, which is, as the name suggests, a tangerine creme (it also allowed me to squeeze a few more 'T's in!).
I love how this turned out! It reminds me of that fabric bunting that you all over Etsy these days. The color combination works well and, overall, it turned out to be a bright, cheery summer mani and what's not to like about that?!
Please take a few minutes to check out the other participants in the ABC Challenge. You can find their posts via the thumbnails below. Thanks so much for reading!
Sunday, May 19, 2013
Watercolor Manicure
Howdy, everyone! Hope you all had a great weekend. I went out with my friends to watch The Great Gatsby this afternoon. I enjoyed it, but I haven't read the book yet. Not sure how I managed to escape high school without reading it, but there you have it lol
Anyway, just a quick post this evening to show off a new-to-me technique I tried out. I've seen some watercolor nails floating around the internet lately so I thought I'd give them a shot. The technique is pretty simple. You start with a base color and then dot on a contrasting polish. While that dot is still wet, you take a small brush dipped in acetone and swipe it over the still-wet dot. The acetone causes the polish to run and pool, similar to the effect that watercolor paints have.
I'm really loving this manicure! I can't wait to try this technique with different colors, but it'll be hard to beat this blue combo. It looks like waves and swirls of water...so pretty!
I was actually a little surprised at how easy this turned out to be. Even if your dots of contrasting polish dry a bit too much, the acetone will re-wet it and make it flow. And, if you get a result you don't care for, you can cover it up with another dot and keep going. Gotta love that kind of flexibility in a manicure!
I actually liked my right hand nails better than my left (which is my usual "photo" hand) so I wanted to throw a shot of those up. Forgive my cuticles, I tend to not take as much care with my right hand since I don't photograph it as much. Bad practice, I know, but I'm not the only one. Right? Right? Ok, Ok, I get lazy!
What do you all think? Has anyone given this technique a try? How'd they turn out?
Thanks so much for reading!
Polish list:
Base color: 3 coats of Wet 'n' Wild Megalast in 2% Milk
Watercolor polishes: Sally Hansen Xtreme Wear in Breezy Blue, Blue Me Away!, and Pacific Blue; Milani in Midnight Satin
Wednesday, May 8, 2013
ABC Challenge: R is for Rubik's Cube
Howdy, everyone! I'm a late poster tonight. I like to get my ABC Challenge posts up on Tuesday evenings but I was exhausted last night and had to wait to paint 'n' post until today. Our letter this week is "R" and I thought it was going to be a super easy letter cuz everything starts with "R", right? Yeah, not as many things as I thought and a lot of them were far too esoteric or general for nail art. I surely could have grabbed a Revlon or a red and just done a swatch, but I wanted to do something more decorative this week. So, after searching words that start with "R" via Google, I finally came up with Rubik's Cube! I have a brother who can solve one of these in about 5 minutes; he says there's a trick to it, but I've never figured it out lol
Whaddya think? I think they turned out really well and a good thing, too, since they took about 3 hours! There was a lot of taping and striping polish used and, of course, after I started I realized there may have been an easier way to do it, but oh well. It turned out in the end and that's all that matters ;)
For some reason, my camera didn't like the green I used (China Glaze's Four Leaf Clover) and it's showing up in these pics as more of a mint. FLC is much more of a grass green, but you get the idea, I hope?
Thanks so much for reading and please take a moment to browse the other ladies' Challenge posts. You can find them via the thumbnails below!
Polishes Used:
Sinful Colors~Snow Me White
Deborah Lippmann~Edge of Glory
Wet 'n' Wild Wild Shine~Red Red
Sally Hansen Insta-Dri~Orange Impulse
Sinful Colors~Pull Over
China Glaze~Four Leaf Clover
Sinful Colors~Endless Blue
Labels:
ABC,
ABC Challenge,
black,
blue,
green,
manicure,
nail art,
nail polish,
nails,
orange,
red,
Rubik's Cube manicure,
Rubik's Cube nails,
white,
yellow
Tuesday, April 30, 2013
ABC Challenge: Q is for Quilted
Howdy, all! I'm less than excited about my ABC post this week, but I'm putting it up anyway. I own approximately 500 bottles of nail polish and not a single one starts with a 'Q'! Not a one! Somehow, this letter kind of snuck up on me (even though I do, in fact, know the alphabet) and I didn't have time to track down a new polish with a 'Q' so I'm hoping some of the other ladies come up with some good ones.
Anyway, I decided to take a whack at quilted nails. I've seen a few folks do some really cute ones and it didn't look too complicated so I thought, "what the heck!". "Heck", indeed! There are a couple of ways to do the quilted look. The first involves striping tape, of which I have none, so I decided to try the second. Basically, you apply your polish in 2 or more coats, what for it to set but not dry completely and then press diagonal lines into it. You're left with dents (on purpose for once) that form a quilting grid on your nails. You can then add your studs or dots or whatever you like where the lines cross.
Here's how mine looked:
I used 2 coats of Orly Blue Suede, a "leather" finish polish in navy. To press the lines in, I just used a piece of stringing floss from my jewelry stash. In hindsight, using something that has a texture on it to press straight lines probably wasn't the best idea. My lines look really messy and uneven. For the studs, I used some little silver bits I got in one of Cina's holiday gem wheels.
I think the technique has promise, I just don't like this particular manicure. Blue Suede just glopped things up, so maybe a different polish would work better. With 'Q' being such a problem letter, I'm interested to see if anyone else does quilted nails. I'm sure theirs will look light-years better than mine!
Please take a few minutes to check out the other gals in the ABC Challenge, you can find them via the thumbnails below. Thanks for reading!
Thursday, April 25, 2013
JulieG's Frosted Gumdrops Collection
Howdy, everyone! I had planned a completely different manicure to blog about today, but after I got finished with this one, I just had to show it off! There was a really great Groupon deal a few weeks back for the new JulieG Frosted Gumdrops Collection. I was lucky enough to snag one of these which included all six of the polishes for $12.99 plus $2.99 shipping. It was a pretty good steal! I'm actually unfamiliar with JulieG's polishes as I believe they're only sold at Rite Aid and there aren't any of those around here. So, I have to say, I was pleasantly surprised with these.
*All product was purchased by myself and all opinions are my own and unsolicited*
Julie G's Frosted Gumdrops are glitter polishes with a textured finish, similar to O.P.I.'s Liquid Sand polishes. As pictured above from left to right, the polish names are Tangerine Dream, Sugar Rush, Hot Cinnamon, Crushed Candy, Blueberry Fizz, and Rock Candy. And here's what I did with them:
I started with 3 coats of Hot Cinnamon on every nail but my ring finger. I would have been fine with 2 coats, but I did the third just to make sure everything was covered. On my accent nail, I did a striped rainbow with all 6 of the polishes. I have to say, the sparkle on these is pretty spectacular! I wish my camera would have captured it better. You can definitely see the texture and it is really similar to the Liquid Sand polishes I've tried.
*All product was purchased by myself and all opinions are my own and unsolicited*
My one complaint on these polishes is that they seem to take a long time to dry, and, since you lose the textured effect with a top coat, there's no real way to speed it up. Just be aware of the possible smudge factor if you get impatient with these. I think the sparkle payoff was worth the extra dry time for sure.
I know there are folks who really hate the texture trend, but I kinda dig it. It's something new and fun to play with. Would I want to wear it every day? No. But it's fun for a change. What are your thoughts on texture polishes? Love them? Hate them? Tell me all about it!
Thanks so much for reading!
*All product was purchased by myself and all opinions are my own and unsolicited*
Subscribe to:
Posts (Atom)